

The pincushion thread catcher that my mom gave me years ago is my sewing table’s best friend. Yeah, I know it seems a little grandma-ish but it’s no surprise that I’m a big fan of things that are both clever and cute. My free pincushion thread catcher pattern and tutorial is an easy beginner sewing project and makes a great DIY gift for any sewer. Are you ready to make your own pincushion thread catcher?
What is a pincushion thread catcher?
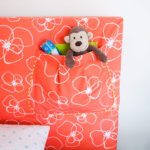
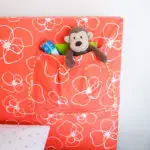
A pincushion thread catcher is basically a weighted pincushion on top like this…


…that anchors your own little trashcan for stray threads and empty thread spools and scraps that you throw in here like so…


Convenient, yes? I’m always a big fan of beautifully functional DIY gift ideas. This is a great scrap buster project and wonderful gift idea for any sewer that you can make in just one evening. Keep reading to see how to sew your own pincushion thread catcher for your sewing room!
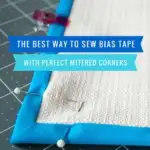
See also: ‘The Best Way To Sew Bias Tape With Mitered Corners {plus a video}’ »
Free pincushion thread catcher pattern that’s fun to sew
I made this red weighted pincushion thread catcher thank you gift for my friend Susan who let me deeply dip into her fabric stash while getting ready for the 2008 Renegade Craft Fair. Yep, I said 2008. That makes this thank you gift 18 months late. Terrible, I know. But better late than never.


I reverse-engineered my mom’s pattern, doubled the pin cushion size, and voila! An easy beginner sewing project and free step-by-step tutorial for how to make a pincushion thread catcher. Keep reading to make your own!


This post contain affiliate links which means that products I recommend may give me a nominal commission at no extra cost to you. Thanks – your clicks help me make more free DIYs!
++++++
Supplies for sewing your own pincushion thread catcher for sewing tables:
- 1/2 yard outside fabric (I used red, white and black flowers)
- 1/2 yard lining fabric (I used black)
- Thread
- Good fabric scissors
- Eco-friendly pillow stuffing
- Two metal door hinges to use as weights (from the hardware store)
- Optional: Plastic clothes line to use as boning and wire cutters
- Self-healing mat, rotary cutter and clear plastic ruler
- Good iron like Rowenta and ironing board
- Sewing machine
NOTE: All seams are 1/2″.
—
—
How to make your own DIY pincushion thread catcher to organize your sewing room:
1. Cut your pincushion and thread catcher pattern pieces
NOTE: All seams are 1/2″.
The weighted pincushion not only stores your pins but also holds a hanging garbage bag steady so you can discard any loose thread or scraps quickly. Use your self-healing cutting mat set to cut out the following pieces for your pincushion thread catcher:
Outside fabric (the red flowers)
- Pincushion: Cut one 9″ x 10″ rectangles
- Straps: Cut two 4″ x 3-1/2″ rectangles
- Bag: Cut one 17-1/2″ width x 11″ height rectangle
Lining (black)
- Bag: Cut one 17-1/2″ width x 11″ height rectangle


2. Make the weighted pincushion to sit on your sewing table
Fold the straps in half and sew a 1/2″ seam.


Maneuver the seam to the center and press the seam open. Turn right side out and ensure the seam is on the back of the strap (rather than on one of the sides or the front).


Put the pincushion piece face up on your table. Place the straps 1.5″ from each side of the pincushion piece on one of the 9″ long sides.


Fold right sides together, sandwiching the two straps inside.


Sew the pincushion shut, leaving about 3″ open on one of the short sides so that you can turn it right side out. Remember that all seams are 1/2″. Trim the corners a bit but not too close.


Turn the bag right side out through the opening. Press your fingers into the corner.


Press flat and set aside.


3. Make the thread garbage bag
Fold the 17-1/2″ side of the thread garbage bag in half right sides together. Sew the seam. Remember that all seams in this beginner sewing project are 1/2″. Your rectangle should now be 8-3/4″ width x 11″ height.


Press the seam open and move it to the center like you did above for the straps. This will put the seam at the back of your bag so it won’t be seen as much. Sew the bottom seam.


Make your thread catcher basket bottom by creating a triangle where the side seam meets the bottom. Your triangle should be 1-1/2″ wide with the seam flattened open. Mark with a pencil and sew across the bottom of the triangle. Then repeat this step on the other side seam.


Turn the bag right side out to see how it creates a soft bottom.


4. Make the bag lining
Basically you do the same thing here as the bag outside with one important difference: You leave a hole in the side seam so that you can turn all of this stuff right side out.
Like the bag outside fold right sides together. But instead of sewing the entire seam, starting from the top, sew 4″ of the side seam. Backstitch.


Then go to the bottom and sew 2″ of the sides seam.


See the hole? This is important later.


Now just repeat what you did for the bag outside to finish off this lining. Sew the bottom seam.


Sew 1-1/2″ triangles on the bottom to create a soft bottom.


Stop here though …leave the lining with the right side in, wrong side out.
5. Attach the pincushion to the thread catcher bag
Line up the pincushion straps on the back of the bag. The back of the bag should be facing (touching) the back of the straps (so in other words, the seam-side of the bag and the seam-side of the straps should be touching each other).


Sew the straps to the bag.


6. Attach the bag outside / pincushion straps to the bag lining
So your bag is right side out and your lining is right side in. This is going to sound weird, but put your bag inside your lining matching up the back seams, and pin. See how the right sides are together? Eventually you’re going to pull this through the lining hole that you made.
Make sure your straps are tucked between the lining outside and lining inside. Sew all the way around to attach the bag outside to its lining.


Pay no attention to my messy sewing table 🙂 Turn the pincushion right side out through the lining hole.


6b. Add in the clothesline boning (optional)
So while this step is optional it helps your thread catcher bag stay open and generally makes the whole thing look nicer.
Cut a 17″ piece of plastic clothes line using wire cutters.


Make a circle with the plastic clothes line and secure raw edges with a piece of tape.


Slip the circle inside the lining hole and work it up to the top of the bag. Secure with pins.


Sew around the bag close to the “boning.”


I think the thread catcher looks great like this! And now it will stay open when it’s on your sewing table.
7. Stuff and weight the pincushion
Now my mom’s pincushion was filled with sand, but I’ve read that sand can dull pins. I picked up a couple metal door hinges for 89 cents each at the local hardware store to use as weights. Then I secured them together using floral wire.


Slip the metal door hinges into the bottom of the pincushion – it will keep it from falling off of your sewing table even with a full basket.


Stuff the pincushion with eco-friendly polyfill stuffing, keeping the hinges on the bottom as weights with the polyfill on top and on the sides.


Hand sew the pincushion closed using a slipstitch.


8. Close the bag
Hand sew the opening inside the bag closed using a slipstitch.


++++++
Be sure to pin my free weighted pincushion thread catcher sewing pattern and tutorial for later:


—
Love to sew? Here are more of my top free sewing projects:


—
Like it? Share it!
The nicest way to say you like it is to pin it on pinterest, post a comment, follow Merriment Design on Facebook, twitter, pinterest, Google+, instagram or sign up for monthly emails. Enjoy! 🙂
Copyright stuff: You’re more than welcome to use this free project and tutorial for personal use. Contact me for commercial use and etsy sales.
Paula Keller
Sunday 8th of December 2024
I have been wanting to make one of these for years, and just recently found your free pattern on Pinterest. I really love the result. Your tutorial was a little vague at times, but I figured out the gray areas. A novice sewer may have more problem. But, thank you for a great and fast project.
Kathy
Thursday 19th of December 2024
Glad that you were able to make it work for you! Happy sewing!
Jacque
Sunday 17th of February 2019
Loved this! Your tutorial was great and easy to follow. Thank you! Wish I could post a picture of the one I made today!
Kathy
Tuesday 19th of February 2019
Hi Jacque, thank you so much for telling me that you liked the tutorial! I would love to see your picture ...I'd love to see your fabric choices and color combos. Are you on Instagram or Facebook? I'm at kathybeymer on Instagram Merriment Design on Facebook. I'm supposed to be working on a new dance bag pattern for my daughter. You're motivating me to get to it!
Cricket
Friday 12th of January 2018
I just finished making 3 of these. Great pattern! After the first one, I decided it was a little too big for me. I cut the pincushion 7 x 8, and the bag 17 1/2 x 9, and the other 2 turned out the perfect size for me. Your comments about the stuffing were interesting and after doing more research, I decided the hinges and the fiberfill were the best option. The hinges fit perfectly even though I reduced the size. Great idea!
Cricket
Tuesday 16th of January 2018
You're welcome! I tried to insert a picture, but I couldn't get it to work.
Kathy
Tuesday 16th of January 2018
I'd love to see your pincushions! I think the smaller size would be really cute on the sewing table. Thanks for commenting and being so sweet!
Wanda
Monday 6th of June 2016
Genius move using the door hinges and plastic clothesline. Thanks for the tute!
Kathy Beymer
Thursday 9th of June 2016
Thanks, Wanda! How did yours turn out?
Linda Simpson
Thursday 19th of May 2016
Thanks for a really great tutorial. I am teaching someone to sew & this will make a great beginner project. The question is: do I use up some of the mountains of old leftover fabric & be economical or buy something really cute for my sewing room. We recently remodeled & replaced our hardware, using the hinges was pure genius as I have a whole pail of them. Sand versus stuffing dilemma. My favorite pincushion that I have had forever is stuffed with poly- fiberfill. I only use Clover quilting pins which are very thin. I stuff them at a fast & furious rate as I sew in my nice & soft pincushion. I have a firmer pincushion which often bends their very thin shaft, so I think I'll pass on the sand.