

Here’s a spooky DIY Halloween trick or treat bag free pattern with ‘sticky’ spiderwebs and creepy spiders that can move and crawl around. Eek!


The sticky spiderwebs on the DIY Halloween trick-or-treat bag are actually thin strips that I cut from VELCRO® Brand fasteners…

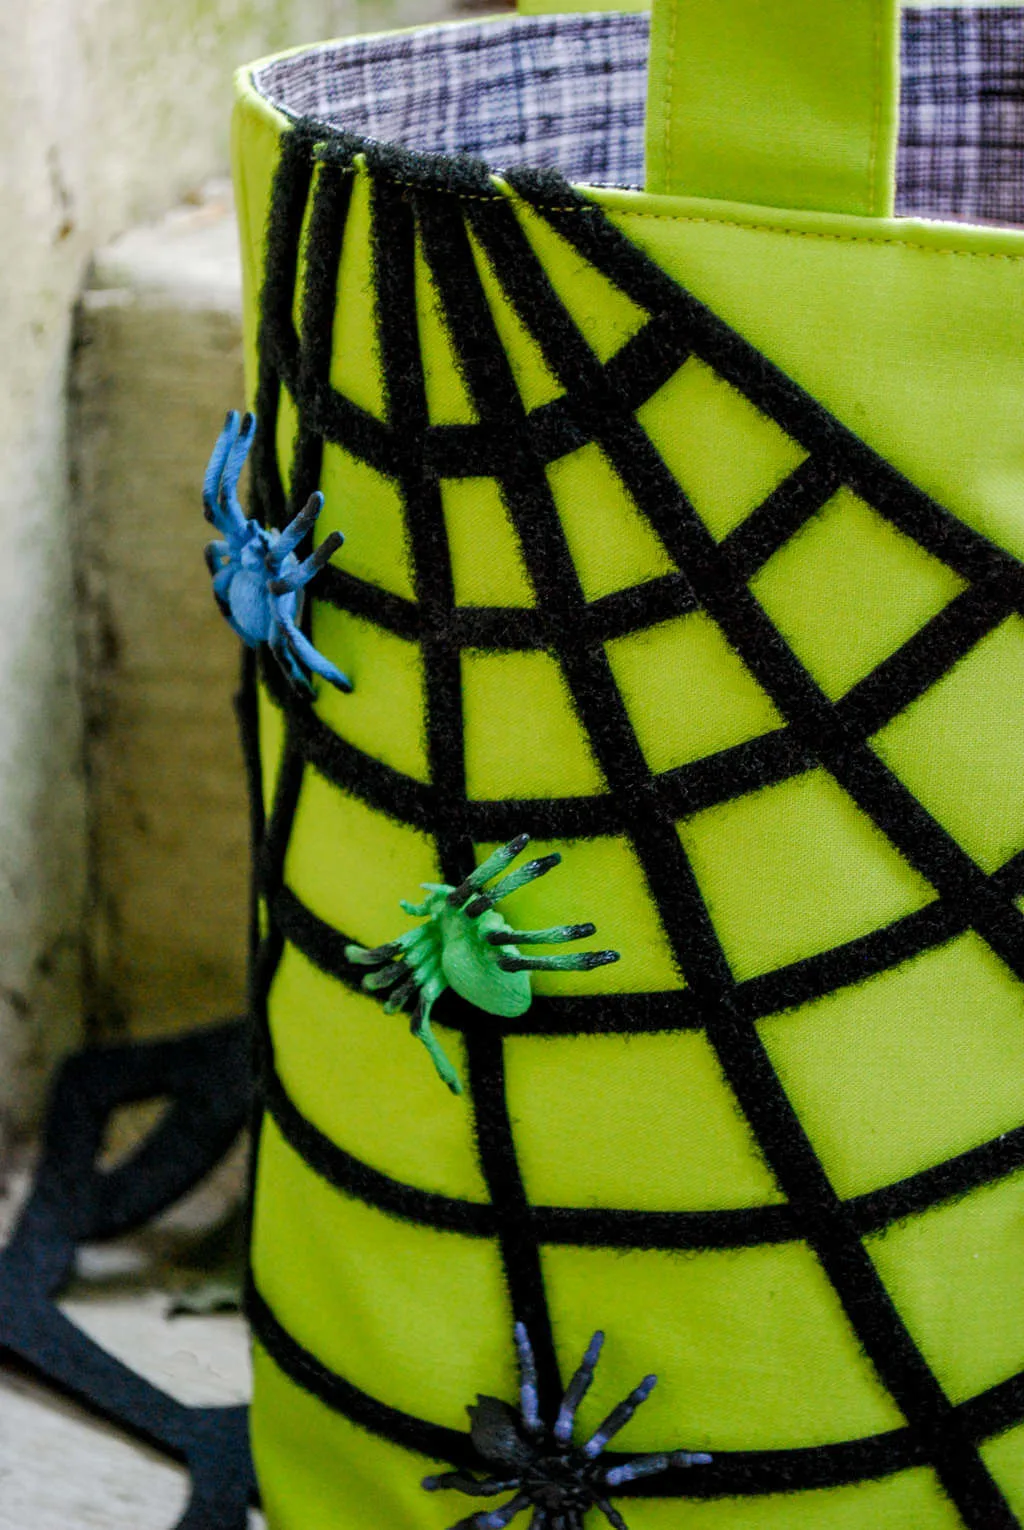
…and the spiders have a bit of VELCRO® Brand Sticky Back fasteners on their backs to attach them to the trick-or-treat bag.


I’m kind of obsessed with our Halloween candy bowl with painted spiderwebs, so for Elise’s DIY trick-or-treat bag I riffed on the idea to make something interactive for the kids to play with while they collect treats.
I can barely contain how much I love this free DIY trick or treat bag pattern. It is crazy fun to move the spiders around!


Luckily, my partner-in-crime, Buzz Lightyear, wholeheartedly agrees.


The DIY trick or treat bag free pattern has a hard bottom so that your trick-or-treaters can set their bags on the ground without the bag tipping over and spilling candy. Don’t you love this fabric? It’s from Jo-Ann Fabrics and Craft Stores. And thanks very much to VELCRO USA for providing the VELCRO® Brand fasteners.


EEK! THE SPIDERS ARE GOING FOR THE CANDY!!


Whew! Luckily, we clearly have a bag full of it. Don’t worry, spiders. We’ll share.
This post contain affiliate links which means that products I recommend may give me a nominal commission at no extra cost to you. Thanks – your clicks help me make more free DIYs!
++++++
Supplies for making a DIY Halloween Trick or Treat Bags with Sticky Spiderwebs + Moving Spiders (eek!):
- Outside fabric
- Lining fabric
- VELCRO® Brand Fabric Fusion fasteners in black (or if you want to sew it on, I recommend VELCRO® Brand Soft & Flexible fasteners)
- VELCRO® Brand Sticky Back fasteners
- Heavy interfacing (I used drapery lining)
- Plastic spiders (make sure the ones you get have bodies that are close to the the legs)
- Piece of cardboard or plastic
- Rotary cutter, clear plastic ruler, self-healing mat
—
How to make a for making a DIY Halloween Trick or Treat Bags with Sticky Spiderwebs + Moving Spiders (eek!)
Step 1: Cut your trick or treat bag pattern pieces from fabric
11-1/2″ x 10-1/2″ for outside (cut 2)
11-1/2″ x 10-1/2″ for lining (cut 2)
9″ x 3-1/2″ for outside bottom (cut 1)
9″ x 3-1/2″ for lining bottom (cut 1)
3″ x 18″ for straps (cut 2)
11-1/2″ x 10-1/2″ for interfacing (cut 2, I use drapery lining, it’s my little interfacing trick because it gives a good weight and feel to bags, but you can use a heavy sew-in interfacing if you want)


Had to take a close up of this mini crosshatch fabric. I love it.


Mark a tiny mark on the top of the trick-or-treat bag outside 2-1/2″ from the left and right sides. Do this on both outside pieces. It marks where the bag corner is going to be.


Step 2: Sew the trick or treat bag pattern pieces from fabric
Sandwich the trick or treat bag pieces in this order: interfacing (my drapery lining “interfacing” is shown here), outside pieces right sides together, and the the other piece of interfacing. Sew 1/2″ seams on left and right sides.


Iron bag seams open.


Baste around the top and bottom to make the trick-or-treat bag easier to work with later.


Step 3: Make VELCRO spiderwebs for your DIY Halloween Trick or Treat Bags
Now you’re going to cut VELCRO® Brand Fabric Fusion fasteners into thin strips to make spiderwebs. Grab the loop (soft) side of the fasteners. Tape the ends onto your self-healing mat.


Run your rotary cutter down the edge of your ruler (slowly so the VELCRO® Brand fasteners do not shift). If you’re using VELCRO® Brand Fabric Fusion, you may get some adhesive on your rotary cutter that you’ll need to scrape off.


Here are your webs.


Peel, stick and cut your webs. Here’s my sketch of what I was going for.


Make your webs go around the bag.


It will start to look like this:


Now if you are using VELCRO® Brand Sew-On Fasteners then you’ll want to sew down your webs each time before adding on another piece. I used the iron-on VELCRO® Brand Fabric Fusion though for this. Now start doing your cross pieces.


I did this during nap times so I put heavy books on them between sessions so that they wouldn’t move.


OK, now time to iron to set that adhesive on the VELCRO® Brand Fabric Fusion fasteners. Follow the package instructions and get that iron super hot!


Webs are done. Time to sew.
Step 4: Sew lining and attach to DIY Halloween trick-or-treat bag
Put your lining pieces right-side together and sew 1/2″ side seams.


Take your bottom piece, fold it in half. Fold your bag in half so that you can match the centers. Pin one side.


Sew it and then pin the other side and sew it too.


Now sew the two short sides.


Clip the corners, carefully.


Here’s your bottom. Now repeat the same steps to put your outside bottom in, making sure to sew carefully through your VELCRO fastener webs.


Step 5: Attach trick-or-treat bag outside to the lining
With the lining and outside wrong-side out, match the bottoms and sew one long side.


Then sew the other long side. Cut a piece of plastic (I used to use industrial plastic when I made handbags for sale, but you can use like a Trapper Keeper, or just cardboard like I did this time – just know if you use cardboard that you can’t get the bag wet).
Slip the plastic/cardboard between the bottoms.


And sew the ends to enclose it inside the trick-or-treat bag.


Step 6: Make and attach straps
Now for the trick-or-treat bag straps. I put interfacing in the middle here to make it a little more substantial. Fold it in half, then fold those halves in half again (like the bottom of these two straps) and iron.


Sew close to the edge. A little trick – sew the open edge first, then the folded edge.


Pin the straps onto the trick-or-treat bag, right sides together, and sew close to the edge to secure.


Turn the DIY trick-or-treat bag right side out. Here’s that cute bottom.


Step 7: Sew the top to finish the DIY Halloween trick-or-treat bag
Fold down the outside 1/2″, and fold down the lining 1/2″ and pin together.


Sew close to the edge, making sure to catch the lining as you sew.


Step 8: Make sticky spiders and attach to the web
Cut some VELCRO® Sticky Back hook (scratchy) side and stick onto the back of your spiders.


I used the round coins and just sliced off the sides.


Stick it onto your DIY trick-or-treat bag. Now put on a costume and start knocking on doors!


Feeling inspired? See more DIY Halloween craft projects, costumes, and DIY treat bags.
—
Like it? Share it!
The nicest way to say you like it is to pin it on pinterest, post a comment, follow Merriment Design on Facebook, pinterest or sign up for monthly emails. Enjoy! 🙂
Copyright stuff: You’re more than welcome to use this free project and tutorial for personal use. Contact me for commercial use and etsy sales.
louise
Monday 28th of October 2013
Great idea! Love the Velcro!
Anne
Saturday 26th of October 2013
That is so awesome!! I've linked to your how-to over at Craft Gossip: http://sewing.craftgossip.com/tutorial-trick-or-treat-bag-with-a-velcro-spider-web/2013/10/26/ --Anne
Marni @ Haberdashery Fun
Monday 21st of October 2013
Love this. Super cute idea.. Saw you on CraftGawker. Is the black fabric from Carolyn Friedlander?
Kathy Beymer
Friday 25th of October 2013
Hi Marni, so glad that you like it! I'm not sure about the fabric - I got it at Jo-Ann. Your trick-or-treat bag is cute! I'm a new follower :)
Sheryl
Saturday 5th of October 2013
OMG this is so cute! I saw it on Pinterest - it's very creative and my son would love it! He likes Spider-Man so I will make a red version. Thanks!