

Here’s my ice skating cake idea with a fondant ice skate cake topper that I made for Elise’s 10th birthday party. I covered her ice skating birthday cake with turquoise frosting and white decorating sugar to make it look cold. I made a number 10 birthday cake for her double-digit birthday by centering my ice skate cake topper on a round cake to represent the number. But you don’t need to make a number cake to make my ice skating cake idea — just download my ice skate topper template below and put it onto any shape cake or number cake that you like.


Number 10 birthday cake with an ice skating theme
I’ve been on a little of a number cake kick for Elise’s handmade birthday cakes. It started with Elise’s age 7 Magic Treehouse birthday cake. Then I made her age 8 LEGO Friends birthday cake and her age 9 Mermaid birthday cake. So I really wanted to make her a double-digit age 10 birthday.
See also: Mermaid Birthday Cake DIY »
And wow, I love how Elise’s ice skating cake turned out. I got to try a couple new easy birthday cake decorating techniques on this ice skating cake: silver luster dust (super fun!) and white decorating sugar (looks fancy and covers up all icing mistakes, yay). Keep reading below for my step-by-step tutorial to make your own ice skating birthday cake!


You can also use my free number 10 cake template printable for other birthday themes. Just make the cake numbers and decorate your own way. You can also use my free printable template to make a number 1 cake for a 1st birthday party, or a number 11 cake for an 11th birthday party, and so on. Scroll down to the ‘Supplies’ section below to download the printable PDF number 10 cake template.


Happy 10th birthday, Elise! We love you so much!


Supplies for making my ice skating birthday cake with free ice skate topper template printable and free number 10 cake template printable
- Kathy’s free ice skate cake topper template (PDF)
- Kathy’s free number 10 cake topper template (PDF)
- Sanding sugar (this brand worked really well)
- White fondant
- Fondant rolling pin with guide rings
- Set of 12 icing colors, gel-based food color
- Two 8″ round cake pans
- Two 9″ square cake pans
- Freezer paper and blue painter’s tape
- Cocktail straw
- Silver luster dust (it’s edible), cake decorating paintbrush, and a little bit of vodka
How to make an ice skating birthday cake with my ice skate topper free printable template
Step 1: Bake ice skating birthday cake layers – 2 round, 2 square
I highly recommend baking the birthday cake layers in advance and freeze them until you’re ready to decorate which is what I do with all of my easy birthday cake ideas. As usual, I baked the Cakegirls vanilla cake recipe which I think tastes amazing and is a special once-a-year birthday treat. Follow their instructions twice to make two 8-inch round birthday cakes and two 9-inch square birthday cakes. Elise helped make her own cake a couple of weeks in advance, and we froze the birthday cake layers until closer to her birthday party.


Step 2: Cut out ice skate cake topper pieces using my printable template
I’m a big fan of adding little fondant details to birthday cakes, like on my Buzz Lightyear Toy Story birthday cake and my Fireman birthday cake. You can make the ice skate cake topper a couple of days before the party – just cover with plastic wrap to prevent dryness. Print out my ice skate cake topper template printable PDF and cut the ice skate pieces out of white fondant. Roll out the fondant using the yellow guide rings — this fondant thickness gives the ice skate cake topper a substantial base.


Lay the upper piece of the ice skate cake topper template onto the white fondant and cut out with a sharp paring knife.


Color a bit of white fondant using black food coloring. I like to use the taffy pull method that I describe in my how to make fondant LEGO Bricks post, so be sure to check that out unless you want to get black food coloring all over your hands 😉 Roll out the black fondant using the yellow guide rings and cut out the ice skate base with a sharp knife. Put the black ice skate bottom together with the white ice skating top. Looking like an ice skate, yes?


Cut out the ice skate blade from white fondant. Later, you’ll add silver luster dust to it to make it look like a real silver ice skate blade. Pretty fun trick. For now, cut out the ice skate blade and set aside.


For a bonus detail, cut out the birthday girl’s first initial from light blue fondant. Again, use the yellow guide rings. I ended up putting the fondant E onto the cake board itself later to personalize the cake for Elise.


Step 3: Make ‘laces’ for the fondant ice skate cake topper
I played around with cutting out tongue pieces and in the end, I thought the ice skate looked most realistic by sculpting the fondant a bit with a knife; sometimes the simplest technique is the best. Lay the tongue piece on top of the fondant ice skate cake topper and trace lightly with a knife — and be sure to avoid cutting all the way through the topper.


Next, make laces for the ice skate topper. I did a little bit of trial and error here too and I settled on an unexpected cake decorating tool: a cocktail straw! Use the cocktail straw to cut tiny laces into the skate. Take the white fondant that goes inside the cocktail straw and roll it into a ball. Flatten four balls for the top part of the ice skate laces – put these right on top of the fondant …there’s no lace hole underneath these four.


Here’s a photo of me making the lace holes for the ice skate cake topper. I made five laces for my ice skating birthday cake. See how a little bit of the fondant goes into the cocktail straw? That the white fondant that I squeezed out to make the top four laces above.


Now roll a little bit of white fondant into a skinny rope. Cut pieces of the fondant rope and wiggle into the laces. Repeat until the entire ice skate cake topper is fully laced up.


Here’s what the ice skate cake topper looks like fully laced. You’ll notice that I have a bit of plastic wrap in the upper corner. I like to cover up the fondant ice skate cake topper so that it remains pliable.


Step 4: Add silver luster dust to the ice skate cake topper blade
This step is pretty cool. This was my first time using silver luster dust and I have to say, it’s really easy and fun to do. Be sure that the silver luster dust that you purchase is food grade. Grab a cake decorating brush and a little bit of vodka. Don’t worry about the vodka — I did some googling research and the alcohol will evaporate when it’s dry. Scoop a bit of silver luster dust powder into a tiny bowl, and put a little bit of vodka into a second tiny bowl. Dip your cake decorating brush into the vodka, and then stir it into the silver luster dust until it forms into a paint. Brush it onto the fondant ice skate blade.


Keep brushing on the silver luster dust until it’s solid silver. Then let it dry completely. Be careful not to bump it while it’s drying or you’ll need to touch up some places.


Step 5: Make glitter cake board and cake box
I used to buy cake boards but I find now that it’s much easier and cheaper to make them myself because I can make them any size that I wish. I plan to add a new tutorial soon to show you how to make your own DIY cake board from foam core and also make custom cake box sizes from foam core — and they’ll only cost about $1 each. Stay tuned for this step.
Step 6: Cut number 1 cake and assemble cake layers
Print my free printable number 1 cake template and place onto the frozen cake. Use a serrated knife to cut out the number 1.


Depending on how tall your cake layers are, you’ll want to cut either two or three number 1 cake layers from the square birthday cake. You can also add more cake layers to the ice skating cake to serve more guests.


Here’s a photo of the first cake layer. Add icing between the layers to make a taller cake. I ended up using three layers for my number 1 cake and two layers for my number 0 cake. And by the way, here is the icing recipe that I used. If you’re adding sanding sugar like I did, you’ll want to make a less sweet icing recipe or else the birthday cake will be way too sweet. I thought this icing recipe was OK but you may want to find another not-so-sweet icing recipe.


Step 6: How to add sanding sugar to a birthday cake
Sanding sugar is a really easy and pretty way to decorate birthday cakes. First, you’ll want to ice your cakes. I usually make the Cakegirls buttercream recipe but because the sanding sugar is also sweet I wanted to use a less-sweet buttercream recipe. I used this buttercream icing recipe, but I have to say, you could probably find a better one out there that tastes less like butter.


You’ll notice that I added a bit of sanding sugar to the left side of the number zero just to check to see if it would work. And it did! Whew.


Here’s how to add sanding sugar to a cake: Put a little sanding sugar into your hand and drop it while pushing down with the other hand. Some sanding sugar will fall onto the cake board but that’s OK; you’ll clean it up at the end. You’ll want to use pretty coarse sanding sugar so that it doesn’t melt into the icing. Here’s the sanding sugar that I used and it worked well; it’s a large amount but you can use it on all kinds of baked goods to add a little sprinkle of sugar to cookies and cupcakes and more. Anyway, keep doing this process on the sides until you have the sanding sugar coverage that you’d like.
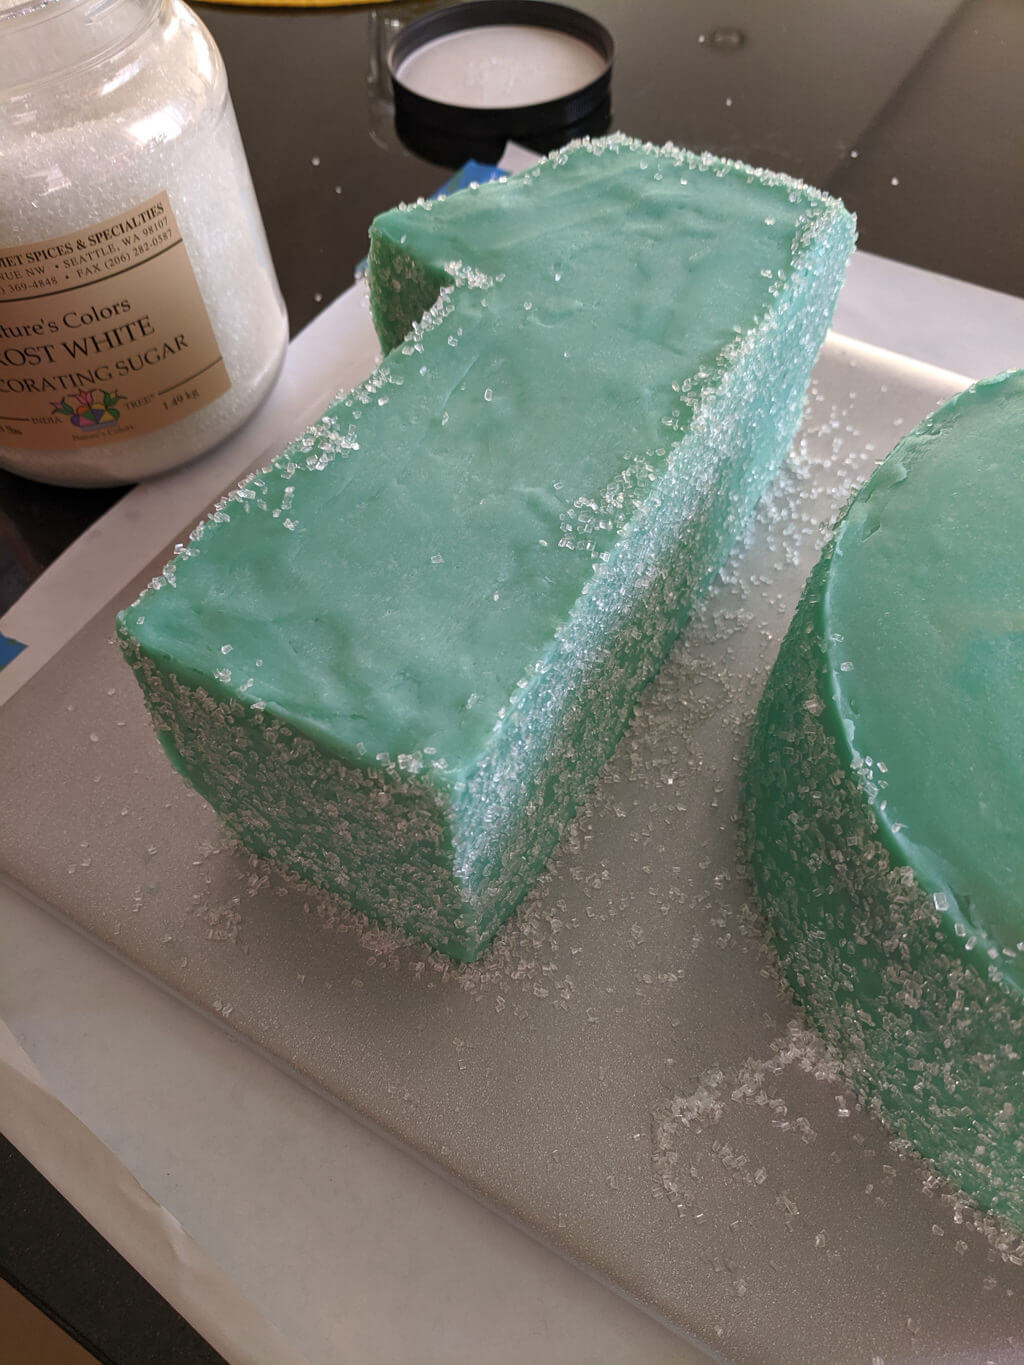

Next, move to the top of the cake and sprinkle as much sanding sugar as you like to cover the cake. When you have your cake fully covered, use a pastry brush or a basting brush (or your hands) to clean up the cake board.


Here’s how the cake looks with just the sanding sugar. You could really stop here and have a nice, pretty 10th birthday cake.


Step 7: Add ice skate cake topper to the ice skating cake
Add the fondant ice skate topper to the top of the cake. You should have had it covered up with plastic wrap so that it’s still pretty pliable. Put the ice skate cake topper on first, then add the ice skate blade underneath. Last, add the letter E to the cake board.


And here’s the finished ice skating birthday cake inside the cake box ready to go to the ice skating rink!


I love the simple, modern look of this ice skating birthday cake, and it tasted great too.


Pin my ice skating cake idea for an ice skating themed birthday party


And see more of my easy birthday party ideas for girls and easy birthday party ideas for boys.
++++++
Like it? Share it!
The nicest way to say you like it is to pin it on Pinterest, post a comment, follow Merriment Design on Facebook, Pinterest, Instagram or sign up for monthly emails. Enjoy! 🙂
Copyright stuff: You’re more than welcome to use my free project, printable templates, and tutorials for personal use. Contact me for commercial use and Etsy sales. Momma’s gotta pay the bills.