

Want to make a cute and easy Magic Tree House birthday cake? Here’s the Magic Tree House birthday cake that I made for Elise’s Magic Tree House party. It’s a number 7 cake (no special cake pan needed!) that looks like the tree house from the popular Magic Tree House book series by Mary Pope Osborne. Don’t worry: This birthday cake is a whole lot easier to make than it looks. I’ll show you how to make your own cute Magic Tree House birthday cake for any age, no actual magic needed.


DIY Magic Tree House party decorations
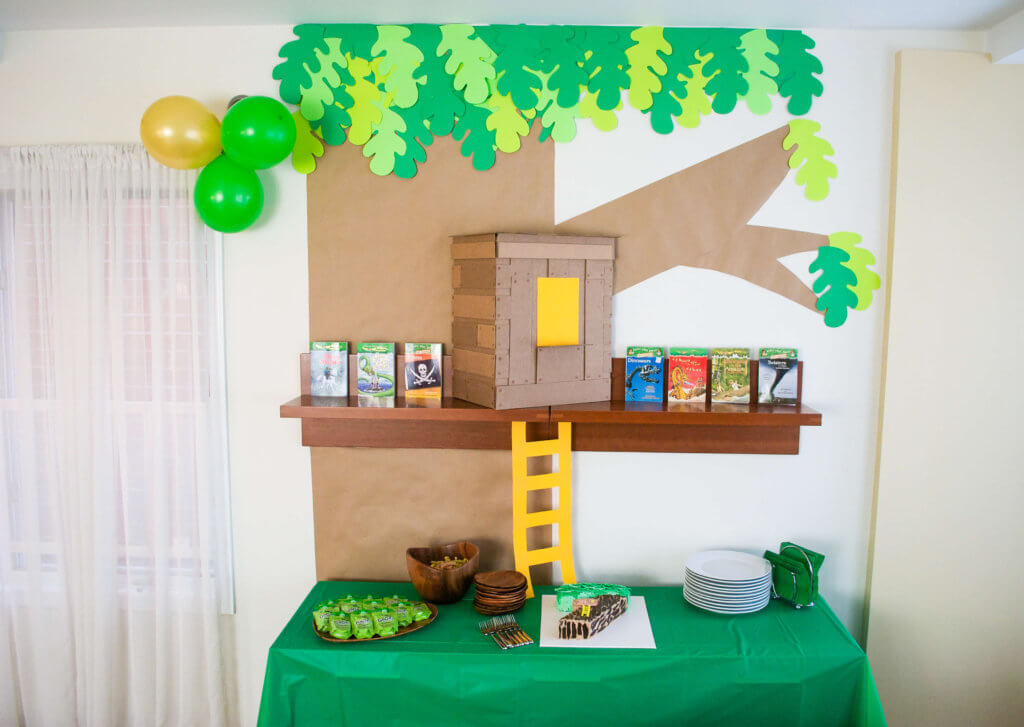
My Magic Tree House birthday cake coordinates with my giant cardboard Magic Tree House party decoration. You guys, I spent like $10 on decorations for this party and this cardboard tree house was such a showstopper.


The leaves are made from fondant that I cut out with a mini leaf cookie cutter, and I made the wooden tree house and ladder out of fondant, edible food coloring markers, and a ruler.


The nice thing about using fondant and chocolate bark is that it totally hides all my icing mistakes 😀


I came up with the idea for this cake so fast it was crazy. I was thinking of a cake with a number 7 and thought, what if the 7 is the tree? And then I sketched this cake on the back of an envelope. I couldn’t believe it. It just popped into my head like magical Morgan le Fey.


Man, I love this Magic Tree House cake. LOVE!! And birthday girl Elise thought it was pretty cool, too.


Where do you think that Elise is wishing to go? To the Amazon Rain Forest? Back to the Ice Age? All the way to the moon?!?


WANNA MAKE IT? Keep reading for my free step-by-step tutorial, template and supply list for making an easy DIY Magic Tree House Birthday Cake for a Magic Tree House party.
Merriment Design is supported by readers like you. If you buy products that I recommend, I may earn an affiliate commission at no additional cost to you. Thanks – your clicks help me make more free DIYs!
Supplies for making an Easy DIY Magic Tree House Birthday Cake:
- 9″ x 9″ x 3″ cake pan (I use the Cakegirls vanilla cake recipe)
- Kathy’s free number 7 cake template and free Magic Treehouse template (PDF)
- Fondant (this brand tastes the best) and non-stick rolling pin
- Food coloring set – green, orange, peach/brown
- Food coloring edible markers
- Dark chocolate candy melts
- Mini leaf cookie cutters
- Parchment paper, freezer paper, jelly roll pan, silipat mat, sharp knife,
—
How to make an Easy DIY Magic Tree House Birthday Cake for a Magic Tree House 7th birthday party:
Step 1: Bake the birthday cakes
First, make the cake for your tree house. Once again I used the delicious vanilla cake recipe from Cakegirls, and this time I had a little 4-year-old baking assistant. You can make the cake a week or two in advance and freeze it according to Cakegirls directions. I used a 9″ x 9″ x 3″ cake pan.


Step 2: Make fondant leaves for the tree house tree
Now let’s make some leaves! You can do this step a couple of days in advance. Take white fondant (I like this brand because it tastes the best), add a little green food coloring, and pull and knead it like salt water taffy.


Roll out the fondant using a non-stick rolling pin, cut out your fondant leaves with mini leaf cookie cutters, and place the fondant leaves onto a parchment paper-lined jelly roll pan.


When you have about half the leaves that you need, add a little more green food coloring to the fondant and cut out more leaves with mini leaf cookie cutters so you have two shades of green for your tree.


Step 3: Make fondant tree house
Now let’s make a Magic Tree House! Print out my free Magic Tree House template (PDF) and cut. Then lay it onto fondant that you’ve colored peachy brown with food coloring and rolled out with your non-stick rolling pin.


After the tree house is cut out, start adding your lines. I eyeballed them using a ruler and food coloring edible markers. It was fun. I put on some NPR podcasts and felt like an architect.


Roll out some yellow fondant with your non-stick rolling pin to make the ladder. Lay my template onto the fondant and cut around it with a knife.


And add a yellow window. Cute, yes?


Set the fondant tree house, ladder, and leaves all aside on the parchment, cover the jelly roll pan with plastic wrap and set aside. I made my fondant cake decorations a day before I decorated Elise’s Magic Tree House birthday cake.


Step 4: Make tree “bark” from chocolate
Now to make the chocolate bark, which you can also do the day before the party. This is the same technique that I used on my Planes Fire & Rescue forest fire birthday cake, so see that cake if you need help. Melt the dark chocolate candy melts and stir until smooth.


Spread the melted dark chocolate candy melts thin on a piece of freezer paper, roll it up, and pop it in the fridge to harden. Again, see my forest fire birthday cake for more step-by-step details here.


Step 5: Cut the cake into an age 7 (or another age, or a straight tree trunk if you prefer)
Let’s cut up that cake. Using my free number 7 template (PDF), cut the cake pieces and assemble onto a cake board. You can make a different age cake and your tree house will be just as cute. Here are more free cake number templates:
- age 7 cake number template
- age 8 cake number template
- age 9 cake number template
- age 10 cake number template
- age 11 cake number template


 - no special pan needed!")
 - no special pan needed!")
Step 6: Make buttercream icing and ice the tree for the Magic Tree House
The day of the party, ice the cake using green and brown buttercream frosting. Once again I used the delicious Cakegirls buttercream icing recipe that I use on all my kids’ birthday cakes.
 - no special pan needed!")
 - no special pan needed!")
Step 7: Add chocolate “bark” to the tree trunk cake
While the icing is still fresh, take the chocolate bark from the fridge, break it up a bit, and put it onto the trunk like bark. See my forest fire birthday cake if you need more details on how to do this step. Also, you’ll see that I needed to add a little bump onto the left side of the 7 to hold up the tree house. Just use some of the extra cake scraps …if you didn’t already eat them, that is.


Step 8: Add fondant leaves onto the tree cake
Start adding your fondant leaves on top of the green buttercream icing, overlapping them a bit here and there.


Use a little icing on the backs of the fondant as yummy sweet glue for your Magic Tree House cake.


Keep adding fondant leaves until it’s lush.


Step 9: Add the Magic Tree House to the cake tree
Add the fondant tree house and ladder and you can head on back to Frog Hollow, Pennsylvania.


Be sure to pin my Magic Tree House birthday cake DIY


And see more of my Magic Tree House birthday party DIY ideas and activities:
Giant cardboard Magic Tree House party decoration – it’s easy and costs less than $10 to make.

Like it? Share it!
The nicest way to say you like it is to pin it on pinterest, post a comment, follow Merriment Design on Pinterest, Instagram, Facebook, or sign up for monthly emails. Enjoy! 🙂
Copyright stuff: You’re more than welcome to use this free project and tutorial for personal use. Contact me for commercial use and Etsy sales.