
Want to sew a gift for your favorite kid? See how to make a DIY fabric memory game for kids. You can use your own photos or you can download my Chicago photos that I took all over the city. You’ll print the photos onto super cool printable inkjet fabric. Yep, you can print onto fabric at home using your inkjet printer! Then it’s easy to sew up the memory game and cut into squares to play. I’ll also show you how to make an easy matching drawstring bag to store the memory game.
See also: ‘Kid-sized messenger bag sewing pattern’ »
Last year I made my niece Madison a super cute pint-sized kid’s pleated apron out of pink retro Wizard of Oz fabric. I added fun numbers cookie cutters and wrapped both in cookie jar wrapping paper. Madison loves the apron and calls it her “pretty.” Madison lives in Arizona and visits Chicago only once a year so I made her a kid-friendly Chicago-themed memory game (and it gave me a perfect excuse to use printable ink-jet fabric. Great stuff …you gotta try it). And I wrapped it in super cute Madison Street Wrapping Paper.

How to play a memory game
To play the game: Put the fabric tiles face down on a table. Shuffle and line them up into rows. Each player must turn over two tiles per turn. If the two tiles match, then the player wins those tiles and can take another turn. If the tiles do not match, the player must turn them face down again and it’s the next player’s turn. The player with the most tiles at the end wins!
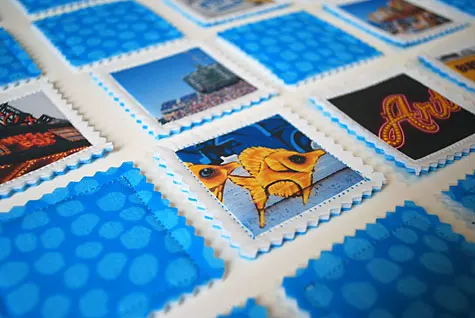
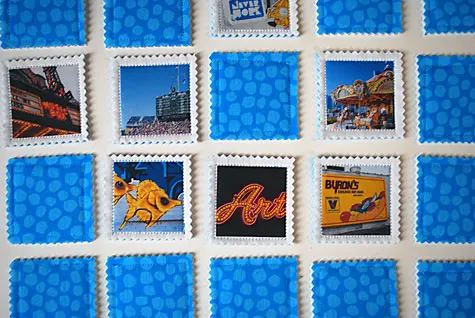
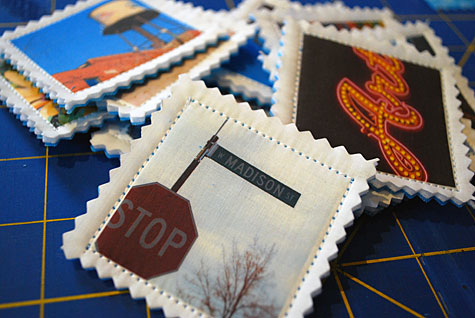
This template makes 48 fabric memory tiles which is a pretty advanced game but kids can choose to play with fewer tiles to make it fit for all age groups.

It’s an easy DIY gift to make for kids
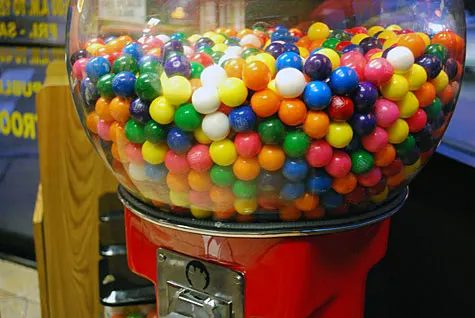
This sewing project for kids is for beginners. You pretty much just sew straight lines for this project. Honestly, the part that took the longest was taking photos around Chicago. First, my friend Heather and I explored the city looking for kid-friendly photo ops such as a bubble gum machine in a corner burrito joint…

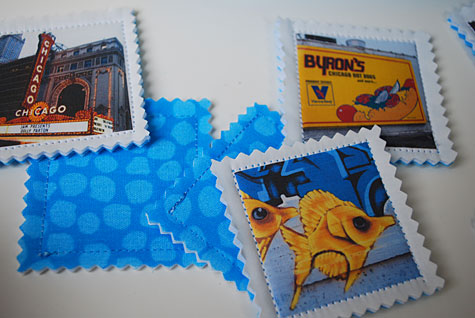
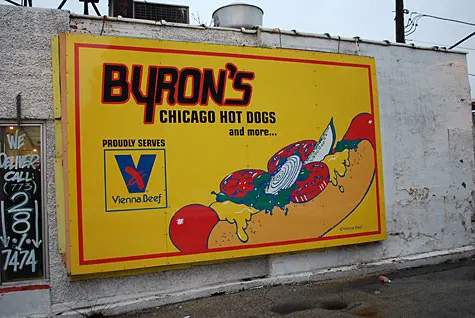
…a colorful Chicago hot dog sign…

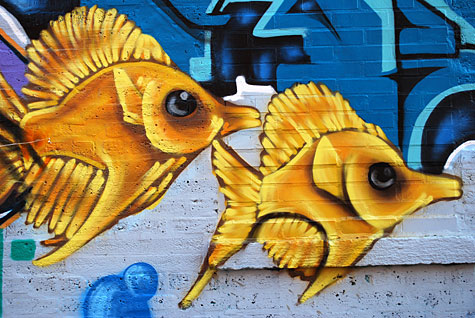
…yellow fish swimming on a graffiti brick wall…

…and — of course — a “Madison Street” street sign. To fill gaps, Elena Kovalevich graciously allowed me to me use some of her gorgeous Chicago Flickr photos. Elena takes fabulous photos …do check them out!
Merriment Design is supported by readers like you. If you buy products that I recommend, I may earn an affiliate commission at no additional cost to you. Thanks – your clicks help me make more free DIYs!
+++
Supplies for making a DIY fabric memory tile game for kids:
- Kathy’s free Chicago-themed memory game template with 24 photos (each sized at 2 x 2 inches)
- Inkjet printable cotton fabric by Electric Quilt Printables (4 sheets)
- Four 8.5″ x 11″ rectangles of blue cotton fabric
- Four 8.5″ x 11″ rectangles of stiff hatband interfacing (recommended) or 8 sheets of white felt
- Thread
- Good fabric scissors
- Zigzag pinking shears
- Rotary fabric rotary cutter, clear fabric ruler, and self-healing mat
- Inkjet printer (laser printers won’t work)
+++
How to make a DIY fabric memory tile game for kids:
Step 1: Print out my Chicago memory game template onto inkjet fabric

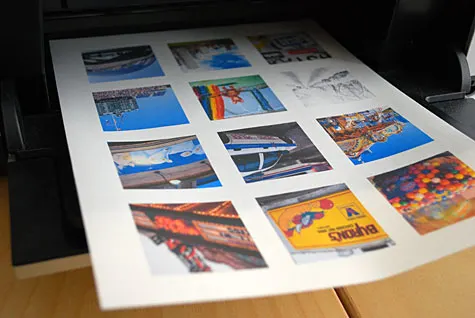
This project is inspired by the fabric memory game idea at Chicago-based Elizabeth Anne Designs originally featured in the book “Stitched in Time.” These tile instructions are different than the original craft; I modified to make them easier and more efficient for beginners to make. Open my free Chicago-themed PDF template. You can use my photos or use my original Photoshop file to add your own. Contact me if you have any questions about using your own photos. Print out two copies of each sheet on printable inkjet fabric using an inkjet printer on high quality. Let dry for at least 15 minutes; I let mine dry overnight.
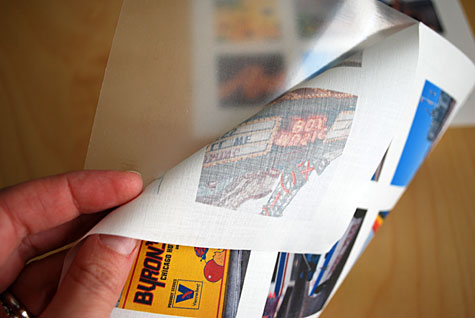
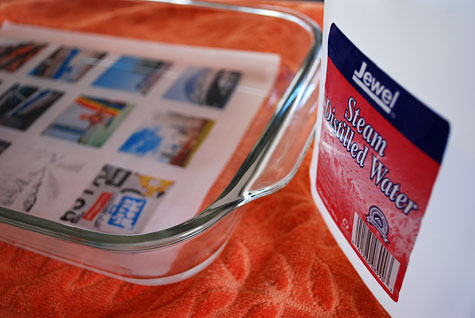
Step 2: Peel off fabric backing and soak the fabric

Peel off the plastic backing from the printable inkjet fabric. Soak for 10 minutes in room temperature water to remove extra ink, ideally in distilled water. Swirl around during that time to keep the fabric moving if you notice a lot of bleeding.

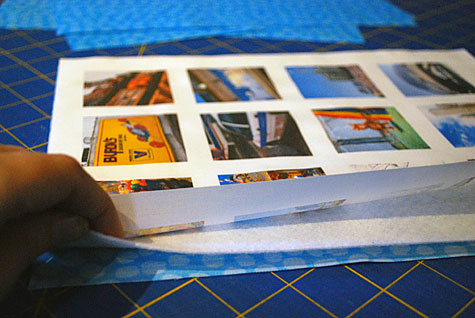
Lay flat to dry on towels. You can blot with paper towels so that water doesn’t pool on your fabric.
Step 3: Make a quilt sandwich of memory game tiles
Stack the fabric layers as follows: Place the blue cotton fabric printed side down. Place your stiff hatband interfacing (or two layers of white felt) on top of the cotton. Put photo fabric image side up on the stack.

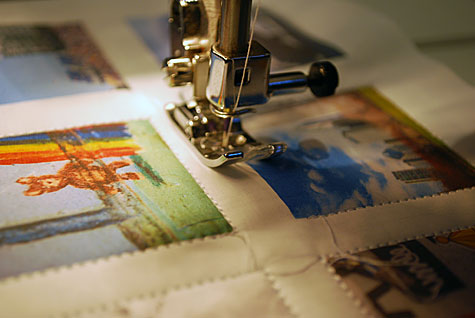
Step 4: Sew the memory game tiles quilt sandwich together
Machine-stitch through the tile layers around the outline of the photo. Smooth as you go to avoid puckering.

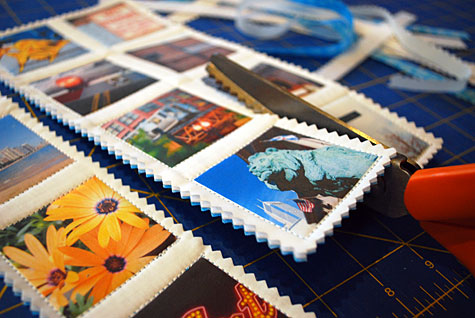
Step 5: Cut out fabric memory game tiles with pinking shears
Cut out the images using pinking shears along the gray cut lines, leaving a white border around all sides.


+++++
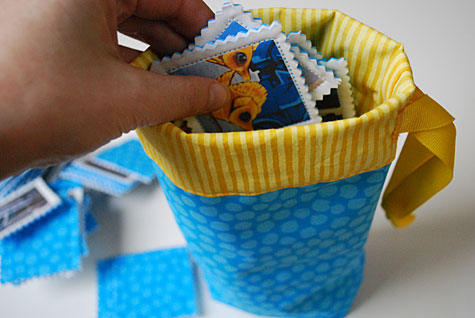
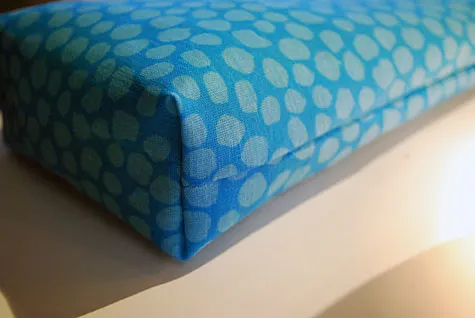
I also made my own pattern for the ribbon drawstring storage bag for the memory bag.
How to make the drawstring storage bag for the memory bag
- One 7″ x 25″ piece of blue cotton fabric (for bag outside; I used my friend Susan Curtis’s stash)
- One 7″ x 25″ piece of yellow cotton fabric (for bag lining and contrasting trim; I used my friend Susan Curtis’s stash)
- 2 feet of 5/8″-wide grosgrain ribbon
- Rotary fabric rotary cutter, clear fabric ruler, and self-healing mat
- Thread
- Good fabric scissors
Seam allowance: 1/2 inch (13 millimeters), unless otherwise noted
The bag instructions are different than the original craft …with my handbag past, I humbly think my pattern for a drawstring storage bag is better. Fold the outside blue fabric lengthwise right sides together to make a 12.5″ x 7″ rectangle. Stitch the long edges of the bag using a 1/2″ seam allowance. Repeat with the lining fabric.
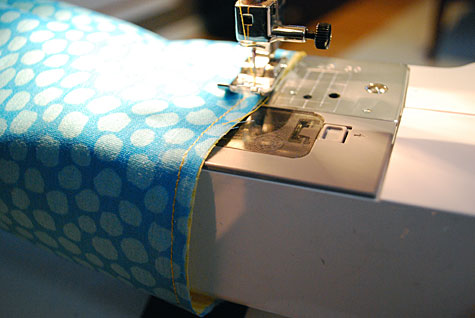
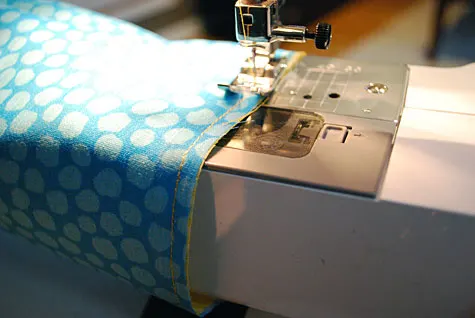
Step 1: Make the bag bottom of the drawstring bag
Now, this part is sort of hard to explain but when you’re done, the bag will be able to stand up. Take your blue piece and fold a triangle where the side seam meets the bottom. Your triangle should be 1.5 inches wide and 1 inch tall with the seam flattened open. Mark with a pencil and sew across the bottom of the triangle. See how it’s already creating a soft bag bottom?

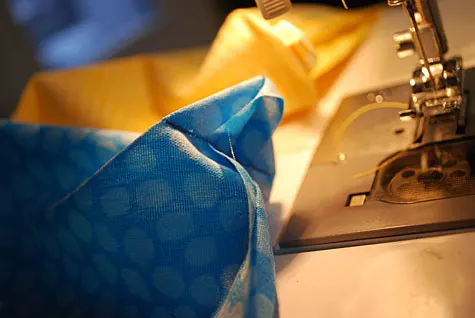
Do this on both sides of your blue and yellow pieces. Now line up a blue triangle with up a yellow triangle, matching one triangle from the outside to one triangle on the inside. Sew. Now your front is attached to your back. Turn the bag so that the blue is on the outside and yellow on the inside.


Step 2: Sew tops together
This step just makes it easier to do the next two steps. With the top edges even, stitch around the top of the bag through both layers. Fold the top down 1/2″ (the yellow will be showing on the front). Fold down again about 1/5″ inches.
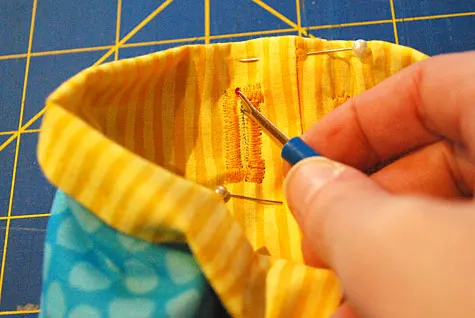
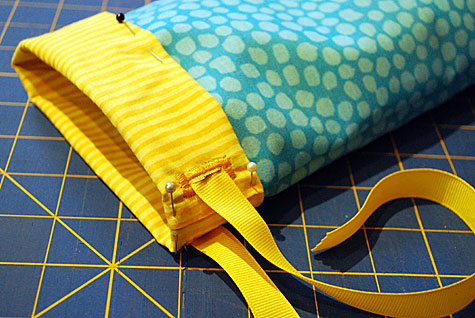
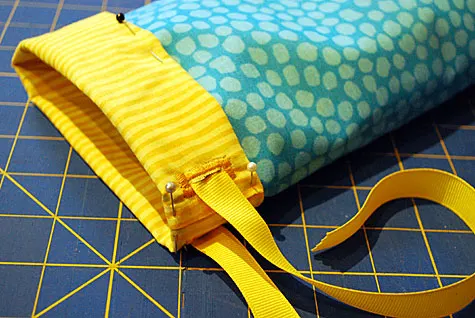
Step 3: Make ‘ribbon holes’
On the one side of the bag, zigzag two rectangle buttonholes large enough for the ribbon to fit into, one on each side of the seam (I eyeballed it just a bit larger but you could measure 7/8″). Using a seam ripper, cut a hole in the middle of the buttonhole through all fabric layers.

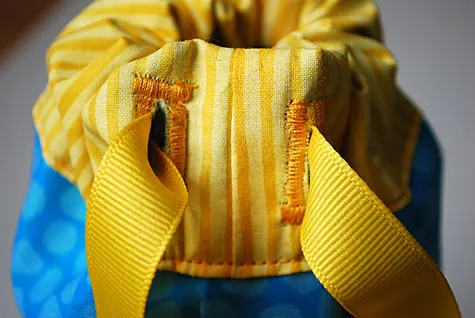
Step 4: Secure ribbon ties
Pull the ribbon through one buttonhole. Slip the ribbon under the 1.5″ yellow trim, around the bag, and through the other buttonhole.
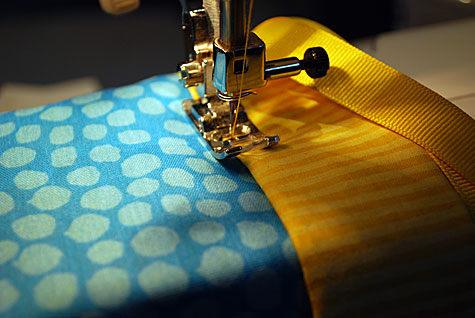
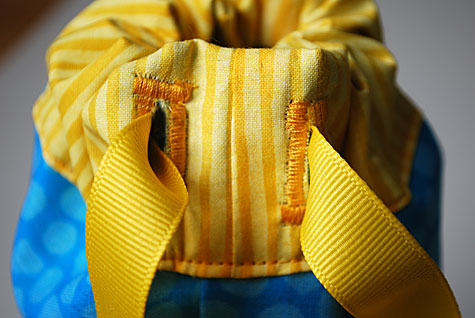
Sew the yellow trim close to the edge to encase the ribbon inside, being sure not to stitch through the ribbon itself. Cut the ends of the ribbon with your pinking shears to give them a pretty zigzag. Tie a knot in the end of the ribbon.

Now you can pull the ribbons to close your drawstring memory tile bag.
And see more sewing projects like my easy pencil case free sewing pattern and my felt stove play kitchen sewing pattern.
++++++
Be sure to pin this fabric memory game for kids:


—
Like it? Share it!
The nicest way to say you like it is to pin it on Pinterest, post a comment, follow Merriment Design on Facebook, Pinterest, Instagram or sign up for monthly emails. Enjoy! 🙂
Copyright stuff: You’re more than welcome to use this free project and tutorial for personal use. Contact me for commercial use and Etsy sales.
L. Palewski
Sunday 15th of September 2013
How can I get a copy of the Chicago pictures shown in your memory game? I was born and raised in Chicago, married and eventually moved to the northwest suburbs. Upon retiring my husband and I relocated to the Great Smoky Mountains. Have been here for 14 great years and still loving it. Would be fun to work on this project, as all 5 of children and all grandchildren live in the Chicagoland area. Great idea.
Kathy Beymer
Tuesday 17th of September 2013
Hi L. Palweski! You can keep scrolling down the page; it's the first link in the "Supplies" section. My posts tend to get a little detailed so sorry it was hard to find!
Here's a direct link to the Chicago pictures if that's easier: https://www.merrimentdesign.com/images/chicago-memory-game-template.pdf
Love your story and thanks for sharing it. I hope your grandchildren like the game!
Michaela
Thursday 10th of January 2013
I am totally making these for my friend who is pregnant...now to scheme with her husband for some adorable pics.
doro K.
Tuesday 24th of May 2011
this would make a fantastic gift.
I linked to your tutorial on my blog - thanks for sharing!
doro
Felisha
Tuesday 16th of November 2010
I love this, if you don't mind I would love to make one for my kids for Christmas. :) Thanks!
Kathy Beymer
Wednesday 17th of November 2010
Hi Felisha, that's great. I hope your kid likes it!
Kim Meagher
Saturday 14th of August 2010
I just finished one set and am working on another. I think this game is absolutely adorable. Thanks for posting the instructions and the template! I used family photos for one set and am using animal photos for the other.
Kathy Beymer
Sunday 15th of August 2010
Hi Kim! I love the ideas of animals. If you're willing to share back, I may make a set for my daughter, Elise :)