
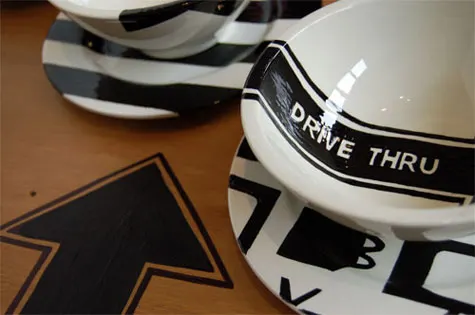
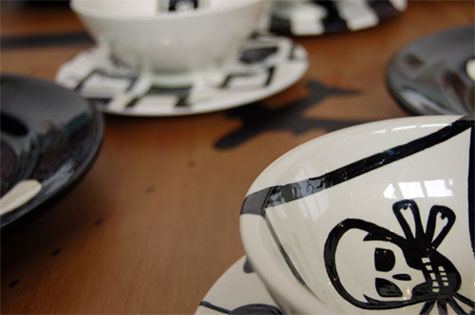
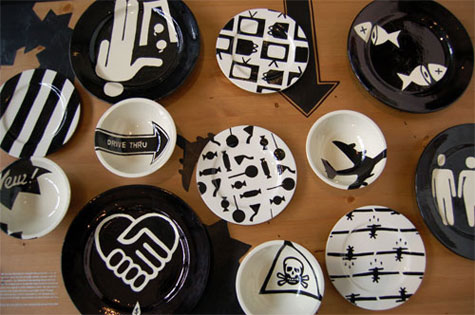
Did you know that more than 96 billion pounds of edible food is thrown away in the U.S. every year? Creative and resourceful Merriment reader Sarah Roarty painted her own unique and unified set of dishware that focused on her love for food and interest in American Food culture.
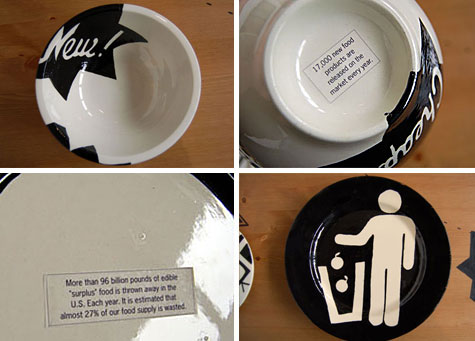
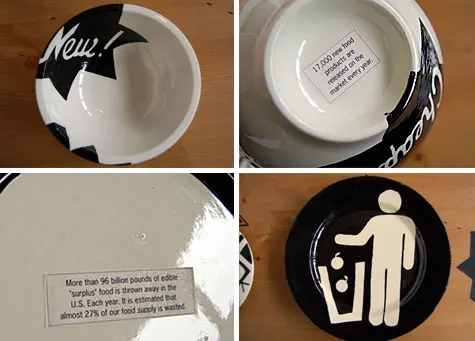
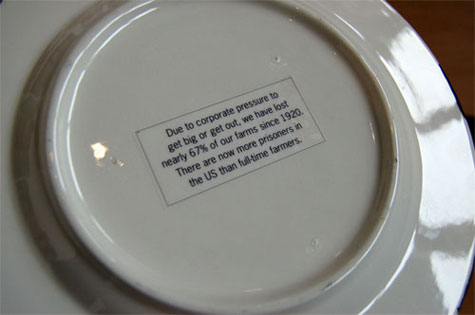
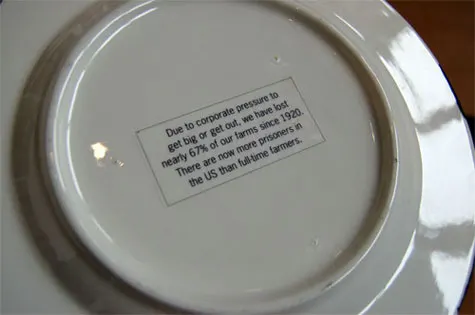
Sarah shows that it’s easy to create a set of dishes of your own by simply picking a theme and running with it, creating this particular theme to remind herself and others to be conscious consumers every day. Often times we forget where our food really comes from and the journey it takes to get to the plate, so Sarah juxtaposed everyday signs with facts.
She used materials that most pottery studios have to create her dishware. Most people think of these studios as only being for birthday parties and showers but using your local studio is a fun way to create a unique set of dishware all your own without having to be a ceramics expert. All in all the process cost around $100 for a set of 12 dishes, which isn’t bad for a unique set of dishes that are dishwasher and microwave safe.
Supplies:
- Paper (for stencils)
- Sponges
- Pencil
- Brushes, various sizes
- Ceramic Paint
- Unfired plates and bowls (found at local pottery studio)

1. Gather all of the materials. Find a local pottery studio where you can buy most supplies, including the unfired dishes. A craft store will have brushes and paint as well, but getting supplies from the place you’ll be firing your dishes is easiest so you know your paint is safe and ready for the kiln.
Sarah took her dishes home instead of painting at a studio so she could take her time and do the painting at her leisure, but she bought materials from the place she would be firing them.
2. Create designs or patterned stencils on paper. The thinner the paper, the easier it is for the stencil to form to the dish (very key when adding a stencil to bowls). The more detail the stencil, the harder it will be to paint. Stick to more simplistic patterns if this is your first attempt. Sarah created her stencil shapes on the computer and printed them out but hand drawn shapes work as well.
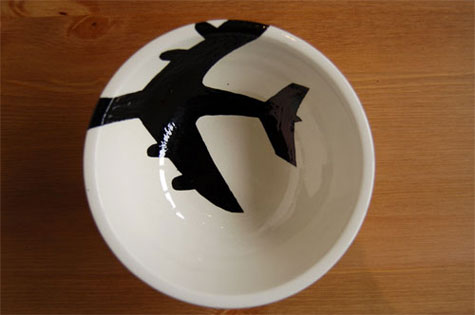
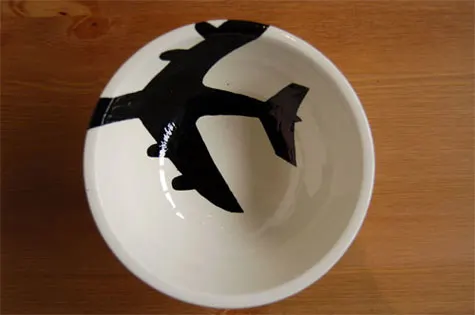
Be creative with your designs. Think of a theme or pattern you would like to follow to make your set cohesive. The designs themselves do not all have to be the same (the more variety the better) but having visual links like a consistent color or symbols help unify the dishware.
3. Once your stencils are all cut out, place them on the bowls and plates and with a pencil, draw an outline of the stencil. The pencil will disappear once the plate is fired, so do not worry about marking the plate up too much.
4. Use the pencil outlines you just created on the plate to fill in your designs. Paint several coats on the plate for a more opaque result. Don’t worry about imperfections when painting, that’s what makes these plates uniquely your own.
5. Wrap the dried dishware lightly for transporting back to the studio. Take your plates and bowls back to the studio to have them fired. Make sure to specify that you want these to be microwave and dishwasher safe for everyday use. The usual pickup times are around a week. Enjoy your new set of unique dishware!

Sonya Fenn
Saturday 16th of May 2009
I have dishes from the 80's, white with blue flowers. I have had 4 other sets of dishes but with time, they have broke or chipped however, the ones from the 80's are still in good shape, so I thought it would be nice if I could just repaint then red, but I have no idea how and can't seem to be able to find anyone who can help me. I live in Oxford Alabama. Thanks.
Sonya
Julia
Friday 10th of April 2009
I purchased a set of white dishware from a department store, does anyone know of any tips to paint or decorate dishware or does it have to be unfired pottery in order to customize?
Kathy Beymer
Wednesday 29th of April 2009
Hi Julia, I've seen a lot of stenciled recycled dishware so I know this has to be possible. I looked around a bit and found a process in the book Simply Green Parties by Danny Seo. Clean the part you want to paint with rubbing alcohol and let dry. Decorate with Porcelain paint - you may need several coats. Bake the plate in your oven at 350 degrees for 25 minutes. Turn off the oven and allow the plate to cool completely inside the oven. The only catch is that the plate will be handwash only.
You may want to call your local pottery place to ask them about reglazing and refiring process which I'm pretty sure will make the dishes dishwasher safe. The process that Sarah Cihat uses is sort of described on Tree Hugger ...check out the comments below the post too.
Grace
Wednesday 11th of March 2009
i love this! do you have any idea where in chicago i might be able to execute such a project?
i remember in my hometown they used to have one of those shops where you paint on a plate or cup and then they fire it up for you, but that won't be nearly as fun as handling the entire project on my own.
Heather
Tuesday 10th of March 2009
Bravo Sarah! I'm going to find a local pottery studio asap...