

Thinking of trying a face mask sewing pattern? Today I’m sharing lots of tips to help when making DIY face masks and face coverings. There are several popular face mask sewing patterns out there and if you’re like me, it can be a little confusing which one to choose. Which style? How to fasten? I’ve been trying out several different homemade fabric face mask patterns & experimenting & making mistakes that I want to share with you to save your time and supplies. Read this post to help you make your own decision about choosing a fabric face covering pattern to sew for non-medical use
Want to add nose wire to your face mask? Scroll to see my video and details on how to add nose wire to purchased or handmade masks.
Making fabric masks for kids? Scroll to the bottom of this post for tips when sewing masks for kids.
BUT FIRST, READ & AGREE TO THIS DISCLAIMER: I have not scientifically tested any of patterns. I don’t know how well they work, or if they work at all, but I am relying on the CDC who says that masks help. I am not a health professional nor a scientist. I make no warranties that these face masks successfully reduce or eliminate anything that you’d prefer not to breathe into your body. Any user of this review, the tutorials, designs, or any products created therefrom assumes the risk of serious injury or death. For information on how to reduce the transmission of smoke particles, pathogens, or allergens, please consult a qualified and competent health care professional or respected scientist (and I am neither).
++++++
Types of DIY fabric face mask sewing patterns
I tried out several variations of three different general types of DIY face mask sewing patterns:
- Pleated fabric face mask sewing patterns
- Smooth-look fabric face mask sewing patterns
UPDATE: I recently started making a new 3D fabric face mask sewing pattern and I personally like it the best of all three styles. It is a bit removed from your lips, so it’s easier to talk and more comfortable for me personally. I find myself grabbing this 3D mask style the most lately.
I tried out different styles, sizes, and ways to fasten them — elastic, fabric ties, ear loops, etc. — on myself, my husband, and my kids. I’ll describe my experience with these face mask sewing patterns below. Be sure to also read this article on how face masks should fit so that you can determine if your handmade face mask fits properly.
The CDC recently posted its own face mask sewing pattern and I’m disappointed to say that I was underwhelmed and not including it. So let’s start with pleated fabric mask patterns…
Pleated fabric DIY face mask sewing patterns
The pleated fabric DIY face mask style visually looks very similar to store-bought surgical paper masks, and there are tons of pleated fabric DIY face mask sewing patterns around with different sizes. I tried out three popular fabric DIY face mask sewing patterns:
- Johns Hopkins Medicine face mask sewing pattern
- JOANN Stores face mask sewing pattern
- Made Everyday face mask sewing pattern
The pleated style for these three patterns are the same; the sizes are different. Larger folks may prefer Johns Hopkins or Made Everyday. Smaller heads may prefer JOANN or Made Everyday’s alternate sizes. For my head size, cutting one piece of fabric 8″ wide x 12″ tall and folding it in half seemed to fit me the best. For my kids (age 10 and 7), cutting one piece of fabric 7″ wide x 12″ tall and folding it half worked for them.


The toughest step in these sewing patterns is making pleats, especially if you’re new to pleats or it’s been a while since you’ve sewn them. I recommend referring to the Johns Hopkins pleated mask instructions because it has a really good pleating diagram. And here’s a tip: Instead of pinning at 1-1/2″ etc. it’s much faster to just mark the fabric with colored pencils.
It is possible to make a filter pocket with the pleated face mask style. What you’ll do is leave open about 3″ on the bottom of the mask to fit a carbon face mask filter into it. Personally, I think that actually slipping a carbon face mask filter into this small slit seems tricky to do in practice so if you really want a filter pocket then I would consider making the smooth-look DIY face mask sewing pattern.
++++++
The smooth-look DIY face mask sewing pattern
There are many patterns out there to make a smooth-looking DIY fabric face mask. I tried Craft Passion’s face mask sewing pattern with filter pocket first and stuck with it. It’s a little more involved than the pleated masks and took me longer to sew each one but for some, the extra time is worth it. Craft Passion offers several sizes — Mens, Womens, Teenagers, Kids. This style is nice because it’s really easy to add a carbon face mask filter to the filter pocket.


I like that it’s easier to get a snug fit with the smooth face mask style because you add either ear loops OR head ties (your choice) *after* the mask is sewn. This is a big difference. Putting ties on *after* the mask is sewn means that you can more easily adjust the ties to the individual wearer. You can choose either ear loops or around-the-head ties with the smooth-look style. And you could even change out the ties. Liam didn’t like the elastic feel so I switched his to knit ties, for instance.


The filter pocket on this style seems easier to slip the filter in and out. There’s quite a large pocket on both sides to fiddle with filters and try to get them in straight.


+++++
How to fasten face masks? The debates between ear loops vs. behind-the-head ties and elastic vs. knit ties.
There’s quite a debate between ear loops versus behind-the-head ties. Elastic ear loops can make some people’s ears sore especially when wearing masks for long periods of time. For me, ear loops are easier to take on and off. However, it can be tricky with pleated face mask sewing patterns to get the ear (or head) loops the right size to fit snugly around ears/heads because you sew the ear bands into the mask.
The knit ties trick at Made Everyday is pure genius & much more comfy than elastic especially for kids. You can use knit ties instead of elastic for ear loops and personally, I think the knit ties are way more comfortable. Here are the knit ties that I use on masks, or you can make your own from old t-shirts or knit fabric by cutting 1″ strips and pulling them until they curl.
If you’d like to try elastic, then I recommend this round cord elastic for soft ear loops. The nice thing about using this round cord elastic is that you can add these silicone cord stops to the ear loops so that you can adjust the mask to fit better behind your ears. Neat trick, yes?
I cut two 7″ knit ties to make ear loops on pleated masks for myself. For kids pleated masks, I cut two 6″ knit ties for ear loops.
My husband and my brother-in-law both rejected the behind-the-head versions. Consider asking the wearer before you choose ear loops vs. behind-the-head.
In summary, try on one mask first before making a bunch or else you may have a stack of masks that are too big. I recommend putting long hair in ponytails if you go the behind-the-head ties route, shown below.


+++++
How to add nose wire to face masks (for either mask style)
Now if you really want masks to fit well, or if you have glasses, then adding nose wire is a must. Nose bridge wire keeps my mask from slipping down my face. I’ll show you three ways how to add nose wire to face masks: (1) adhesive nose bridge wire, (2) sewing wire into the mask while you’re making it, (3) adding wire to purchased or finished masks.
Option 1: Adhesive nose bridge wire
An easy no-sew option is to attach adhesive nose bridge wire to the outside of your mask; the adhesive tends to last several washings before needing to swap out a new one. Fortunately, this pack of 100 adhesive nose bridge wires is low priced.
Option 2: Sew wire into the mask while you’re making it
This option is easy when sewing masks yourself. Just slip the wire inside the mask and sew into the seam allowance about 2″ from the side.
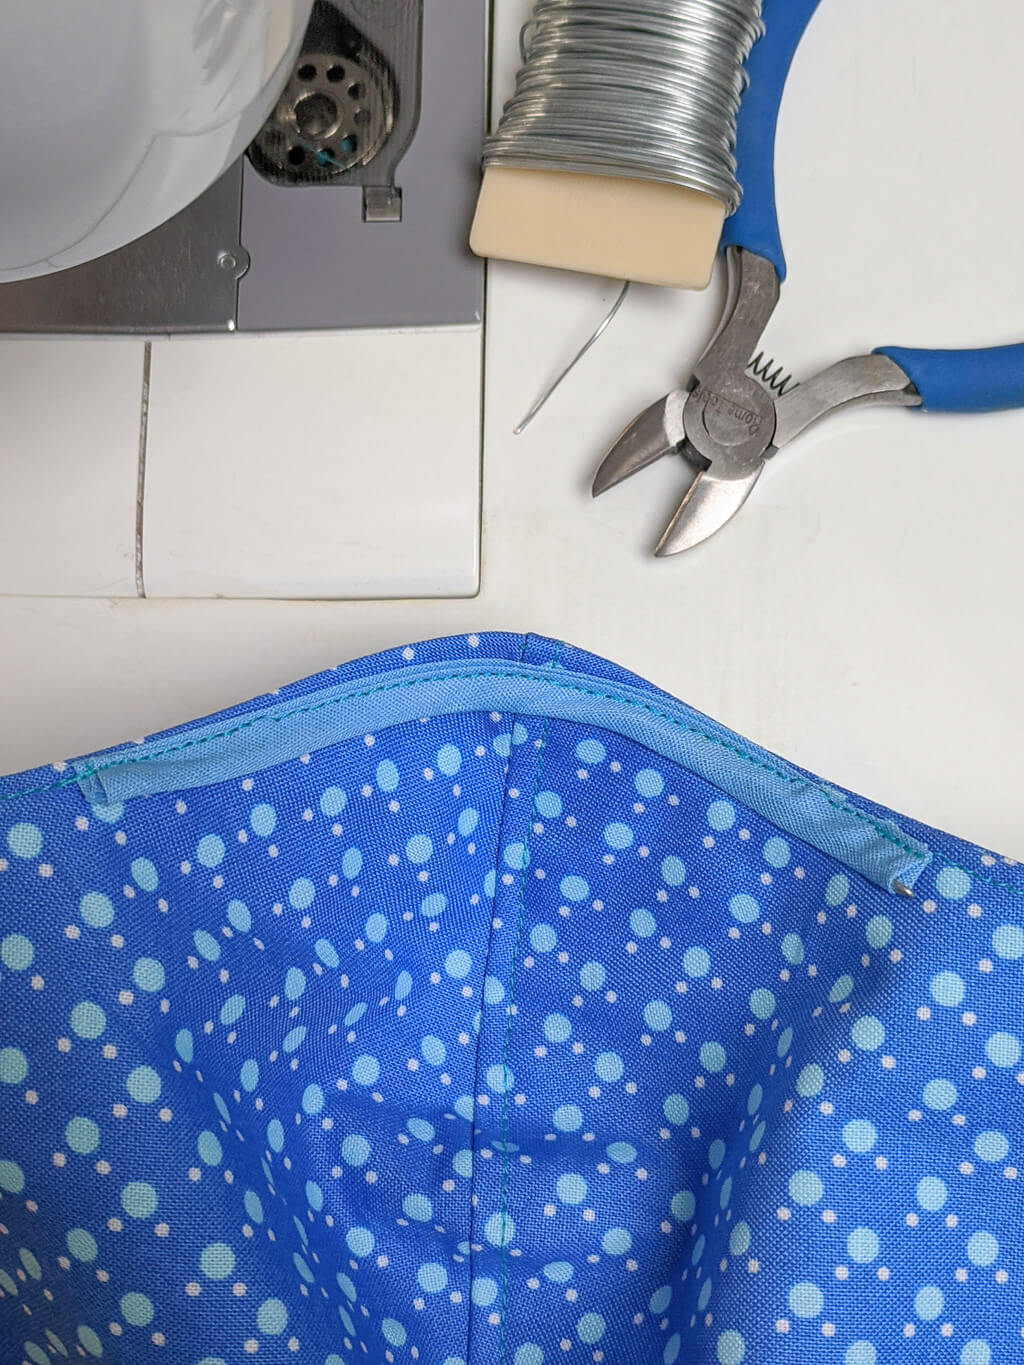
I prefer these wide nose bridge wires. Sew a little “pocket” (see the image below) to add these wide nose bridge wires inside the mask which I think is a bit more comfortable than thin silver wire. Below, you can see the pocket where I slipped the wider nose bridge in, then sew the end shut so it’s secured permanently. If you do use thin silver wire then be sure to bend the ends into little circles using these wire cutters to avoid pokes.


Option 3: Add nose wire to purchased masks (or after masks are sewn)
This option is good for adding nose wire to purchased masks. You can use these wide nose bridge wires which personally I prefer, or you can use thin silver wire and cut and bend it using these wire cutters. Below I’m showing the thin wire sticking out a little bit so that you can see how I bent the ends into little circles to avoid pokes. Normally, the nose wire will be totally inside the casing before sewing it in.


I’ll show you Option 3 in detail below…
How to add nose wire to purchased masks
Step 1: Cut and sew bias tape (or a strip of folded fabric) onto the top inside of the face mask
I sewed 4″ of bias tape on the top inside of the mask. Use 1/4″ bias tape for thin silver wire and 1/2″ bias tape for wide nose bridge wires. No bias tape? Then just cut a rectangle of fabric 4″ x 2″ to make your own 1/2″ casing (fold it in half, iron, then fold raw edges into the center, iron). Center the bias tape onto the top edge of your mask and pin or clip. Make sure the open edges of the bias tape are on the top edge of the mask, like the photo below; the folded edge of the bias tape should be on the bottom.


Then sew the bias tape along its open edge to secure it to the mask and close the open edges of the bias tape. If you used 1/2″ bias tape, then be sure to also sew the bottom edge to secure it. I am showing 1/4″ bias tape below.


Step 2: Cut a piece of nose wire and insert into the casing
Slip in a piece of removable floral wire / twist ties / pipe cleaner / opened paper clip. Below, I’m showing the thin silver wire that I cut and bent using these wire cutters. Curve both ends of the wire so they won’t poke you when wearing the mask. To sew the wire in permanently (so that it’s not removable) then sew both ends shut after inserting the wire to permanently encase the wire in the mask.


Here’s what the nose wire casing looks like inside of the pleated-style face mask using thin silver wire:


Step 3: Put on the face mask and bend the wire to fit your nose
Here’s what the nose wire will look like once it’s fully inside the face mask. Put on the face mask and bend the nose wire to better fit your nose.

++++++
Tips when sewing DIY face masks for kids
Making kids’ masks involved some trial and error to balance what my kids would be willing to wear and what stayed on best. Here’s my advice for making kids masks:
1. Use soft knit ties rather than thick elastic.
My kids (ages 7 and 10) greatly prefer the knit ties to elastic for both ear loop and behind-the-head ties that we tie into a bow. You could try elastic for around-the-head kids face mask; my kids just didn’t like the feel of elastic. Here are the knit ties that I use on masks, or you can make your own from old t-shirts or knit fabric by cutting 1″ wide strips and pulling them until they curl. You could also try ribbon, fabric ties, or shoestrings.
If you’d like to try elastic, then I recommend using this round cord elastic for soft ear loops. The nice thing about using this round cord elastic is that you can add these silicone cord stops to the ear loops so that you can adjust the mask to fit better behind your child’s ears. Neat trick, yes?
2. Consider age and activity level when choosing ear loops vs. behind-the-head fastening.
My kids have pleated and smooth masks, some with ear loops, some with behind-the-head ties. For my kids, it seems that the around-the-head ties have stayed on best (compared with the earloop style) but consider your child’s age and activity level. We tend to choose to wear the ear loop style for walks and the behind-the-head style for greater physical activity.
For pleated kids masks: I follow the JOANN Stores face mask sewing pattern. For my kids (age 10 and 7), cutting one piece of fabric 7″ wide x 12″ tall and folding it half worked for them. I use two 6″ earloops for ear loop styles.
For smooth kids masks: Craft Passion offers a kid-sized mask pattern.
3. Add nose wire to kids’ masks.
It’s best to avoid kids touching their masks while wearing them to adjust their fit. Adding nose wire to kids’ masks helped them fit my kids better. I use this these wide nose bridge wires on kid’s masks but you can also use thin silver wire.
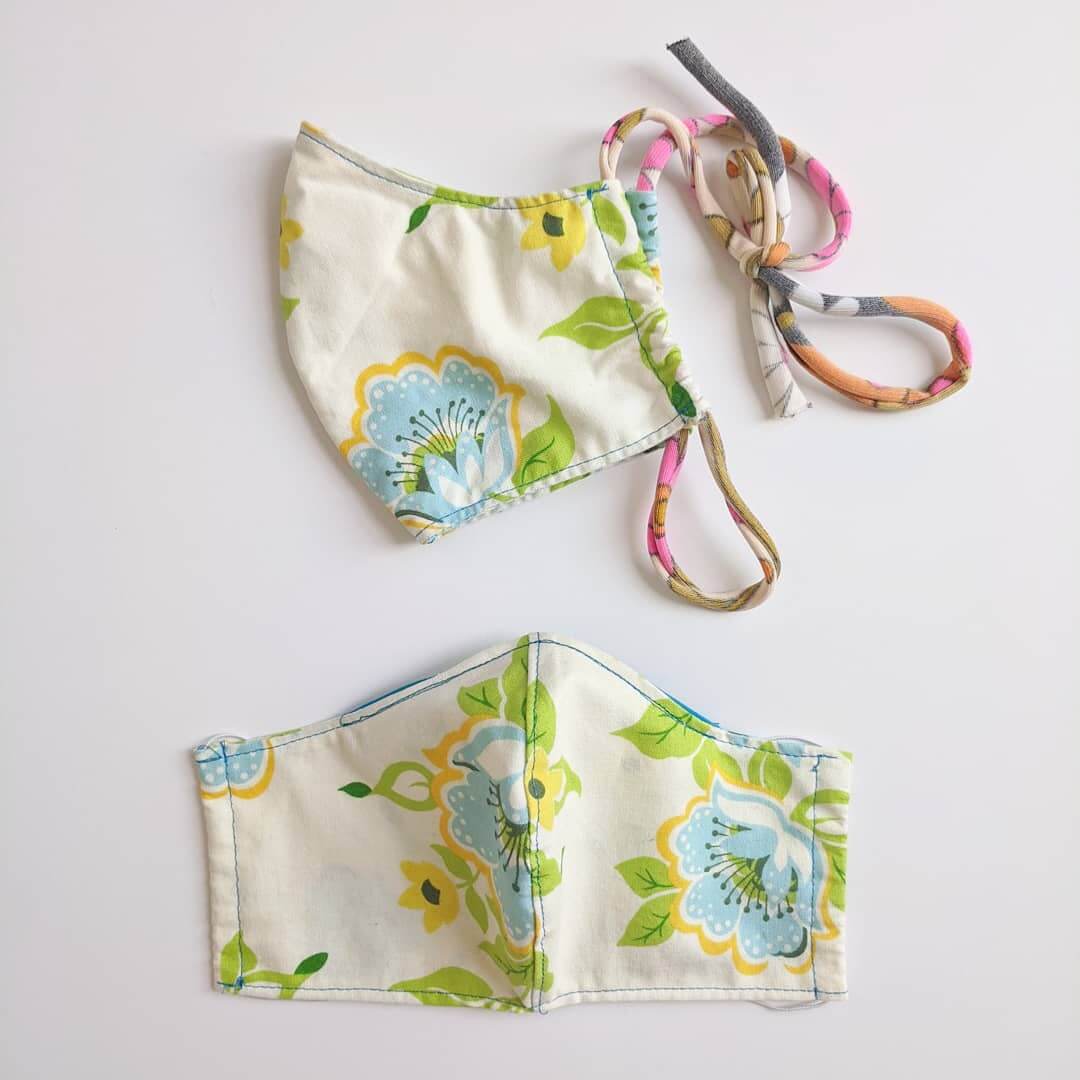
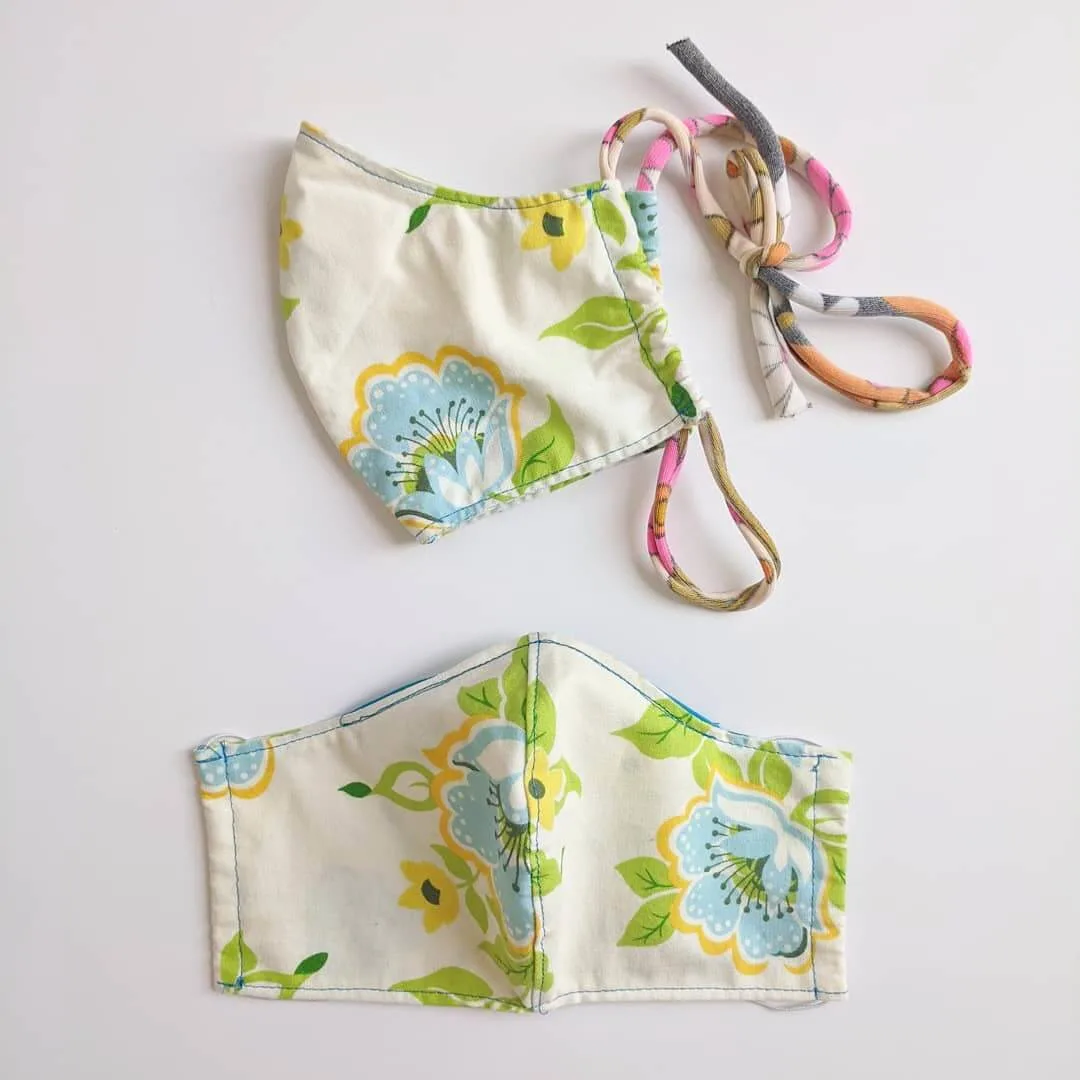
Below are my 1o-year-old’s daughter’s smooth-style face masks. This one uses behind-the-head knit ties using the Craft Passion style to allow it to fit snugly on the top & bottom and tied it into a bow (note that the smooth mask but also works with ear loops).
++++++
Final tips when sewing face masks:
1. Choose your mask fabric wisely
What type of fabric to choose? There are several scientific studies going on now that test the best material for homemade face masks, so be sure to read do your research before choosing fabric. After making several masks, I realized when I held them up to the light that the fabric was just way too thin. Refer to the patterns above to choose the proper tightly woven fabric.
2: Consider adding a disposable filter
If you make a filter pocket, consider adding a disposable carbon filter into the pocket. Here are some kid face mask filters that are carbon filters to try in your kid’s masks.
3: Consider adding interfacing
Personally, I prefer a thicker mask that is still breathable, so based on JOANN’s tutorial recommendation I added sew-in interfacing to line my masks. If you don’t have interfacing, you could experiment with doubling-up your fabric (so 4 layers of fabric rather than 2) or add a filter pocket to add carbon face mask filters, or both. Just make sure that you can still breathe through it.
See the photo below for how to trim the sew-in interfacing out of the seams before turning it right-side out. The face mask will be less bulky and easier to turn curves and topstitch if you trim out the interfacing from seams first.


++++++
How to wash face masks
The CDC recommends washing face masks – please see their guidelines here. Personally, I wash our fabric face masks inside a lingerie laundry wash bag to avoid tangling (especially for our masks with ties around the head) and wash them with soap on the highest water temperature possible. I dry them in the dryer. I also remove the nose wire from masks before washing and sterilize the wire before putting it back into a clean mask. But again, I’m not a healthcare expert nor scientist so please refer to them for proper mask sanitation or sterilization.
++++++
I hope that this post helps you out when you’re sewing homemade fabric masks for non-medical use. I’d love to hear your tips. Be well!
++++
Be sure to pin this DIY face mask free sewing pattern review:


And be sure to check out my free sewing patterns.
—
Like it? Share it!
The nicest way to say you like it is to pin it on Pinterest, post a comment, follow Merriment Design on Facebook, Pinterest, Instagram or sign up for monthly emails. Enjoy! 🙂
Copyright stuff: You’re more than welcome to use this free project and tutorial for personal use. Contact me for commercial use and Etsy sales.
Victoria
Wednesday 6th of May 2020
This was the best review and instructional article I’ve found. Thank you for doing the research and sharing. I have found that even though I am an adult, the adult pattern size is much too big. Add wearing glasses, and I have been frustrated. You solved my dilemma.
Kathy
Tuesday 12th of May 2020
Thank you so much, Victoria! I really glad to hear that it helped you :D and it was really nice of you to take the time to comment. Stay safe!