
The first time I saw a sewn appliqué tie onesie bodysuit was about a year ago in an Uncommon Goods catalog. I thought it was really cute and looked super simple to make.
Well, my friends Anne and Darren just had a baby boy so I decided to put my money where my mouth is.
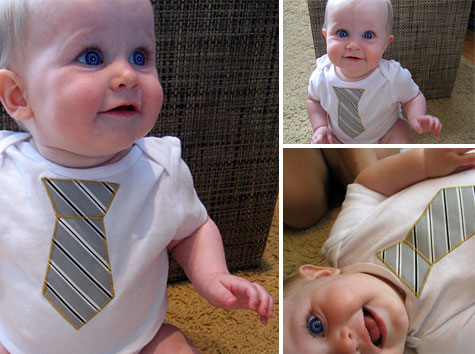
(First I would like to thank Tamara Bohorquez and Jon Sawyer for letting their adorable daughter Sienna model for me again. She’s looks like a sassy little Annie Hall, doesn’t she?)
You’re welcome to use these instructions and templates for free for your own personal use. Anyone using the template simply post a comment below or email me to track its usage.
Supplies:
- Kathy’s free onesie tie shape template (PDF, includes stubby and skinny tie patterns)
- Pack of baby onesie bodysuits
(I used short sleeved white onesie baby bodysuits
; also try long-sleeve white onesie baby bodysuits
or eco-friendly organic cotton baby bodysuits
- Main fabric
(I used gray, black and white striped shirting …you could also recycle old buttondowns)
- Fusible interfacing
- Yellow thread
- Good fabric scissors
- Optional: Rotary cutter
, ruler
and gridded mat
- Sewing machine
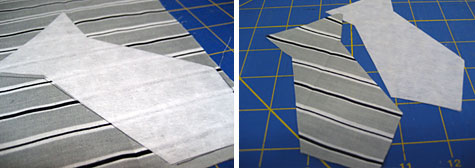
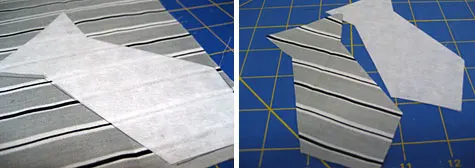
Print my onesie tie shape template and cut. Place pattern on top of the right side of your fabric. Hint: If you have striped fabric lay it on the diagonal so it looks more like a tie. Trace lightly and then cut with scissors (alternatively you can cut it out or trim it up using a fabric rotary cutter).
Cut the tie shape from the fusible interfacing, making sure that the adhesive side is facing up. Iron the interfacing onto the wrong side of your fabric tie.
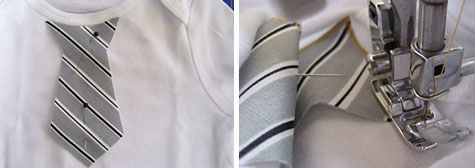

Unsnap the onesie bottom. Pin the tie onto the upper middle of the onesie. I like to use the colored straight pins (they make me smile).
Set your sewing machine to a tight zigzag stitch. You’re going to sort of bunch and slide the onesie onto your machine, making sure that only the top level is being sewn. It’s OK for it to be bunchy *around* where you’re sewing …just don’t let it bunch *under* what you’re sewing …the onesie is stretchy knit so you’re going to need to avoid stretching the fabric while you sew to avoid puckering. This all sounds harder than it is. Just be aware of it.
Start your sewing at the left-side inner dip, going down the tie to the point and back around the perimeter. When you get around the entire tie perimeter, ensure your needle is down in the fabric, lift your presser foot, turn, lower the foot, and then sew straight across the fabric to create the necktie knot.


COPYRIGHT NOTE: You’re more than welcome to use this theme and templates for your own personal use. Please post a comment below or email me if you use this project so I can smile when I see that it’s being used. Craft and pass it on!
Jessica
Wednesday 29th of October 2014
Thank you for sharing and making it sound really simple! I'm definitely making this for my 2 year old, and might even make a matching t-shirt for my 7 year old :P I'm a beginner, so we'll see how they turn out!
Noelani
Monday 2nd of April 2012
I have new grandson due in June, and a box full of scraps of fabric that is so nice I can't bear to just chuck it all. This is a perfect way to make use of some of it!
Darlene
Saturday 3rd of March 2012
My son and daughter-in-law are expecting their first child this spring. My son wears bow ties all the time and even though they're having a girl, I'd LOVE to make one of these for their baby just for fun. I know he'd get a kick out of it! I think they're super cute too! Thanks for sharing the idea and all the how to's!
Tiana Flint
Sunday 5th of February 2012
Thank you for your generosity in making your instructions/template available to a novice :)
beni blevins
Wednesday 4th of January 2012
I have a 5 week old boy and a girlfriend who is having a boy in Feb. I am going to make a few of these. They are so stinking cute!!!!! :) Thank you for sharing the how to.