Recycled Fabric Napkin Rings from Saran Wrap Tubes
Decorations & Favors, Earth Day, Free Patterns, Home, Recycled Crafts, Under $10, Under 1 Hour

I made this fabric napkin rings recycled craft from an empty Saran Wrap tube. A few months ago I was getting ready to throw away an empty Saran Wrap box and happened to notice how the cardboard tube inside was oh so strong and sturdy. What useful thing could I make with such a pretty?? It’s round. Not easily crushed. Ah! I could cut it, cover it in fabric, and make napkin rings!

And that is how a cardboard tube ended up in my craft closet for three months. So this rainy-sunny-rainy weekend I sat down, fiddled a bit, and here we go! Cheery fabric napkin rings just in time to brighten up your summertime picnics.
Supplies for making my fabric napkin rings recycled craft (for 8 rings):
- Empty Saran Wrap Tube
- 1/4 yard of fabric (you’ll use less but this is the minimum at most places)
- 1/4 yard of no-sew interfacing (again, you’ll use less than this)
- Grosgrain ribbon
- X-Acto knife
- Pinking shears
- Fabric glue
(or Double stick tape
)
- Self-healing mat
, rotary cutter
and clear plastic ruler
or good fabric scissors
(Buy a cutter and mat! You’ll use it all the time. Mine is well-loved, as you’ll see in the photos below
Please post a comment and let me know how this craft idea works for you. And share your own photos at the MerrimentDesign.com Facebook page, “I made it!” flickr photo gallery or tweet a picture to @merrimentdesign.
How to make fabric-covered napkin rings from a recycled cardboard Saran Wrap tube
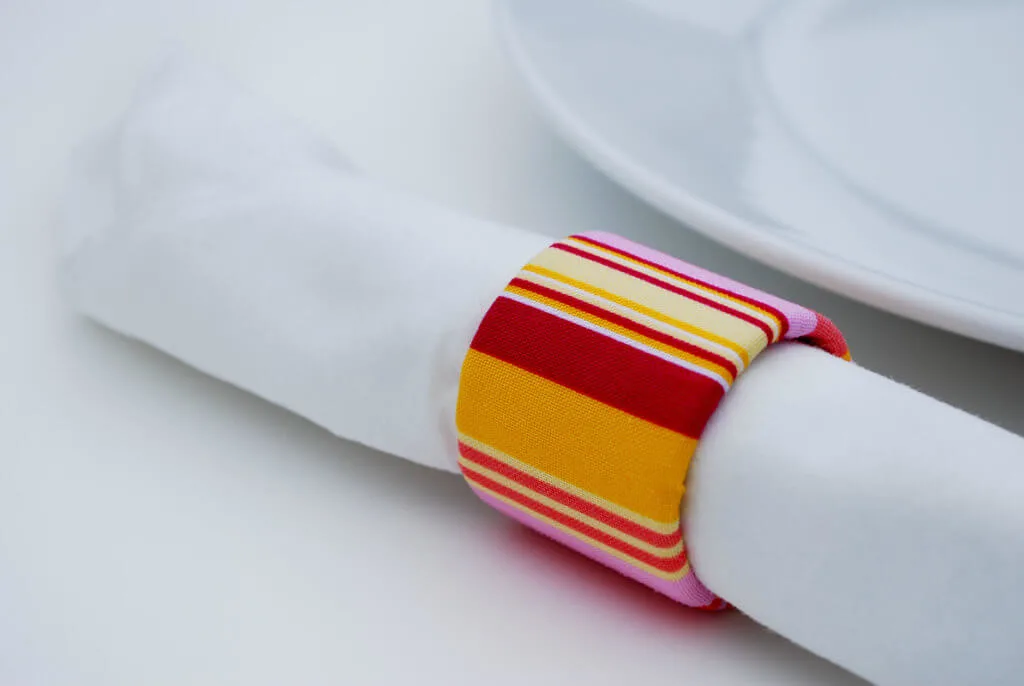
One typical cardboard tube of Saran Wrap will make 8 napkin rings that are 1-1/2″ inches wide and 1-3/8″ diameter. Or you can make wider rings if you only need 6. These rings are best for premium square paper napkins and plastic silverware, but you can squeeze fabric napkins inside with no silverware if you roll them very tightly.
How to make recycled napkin rings – First cut napkin rings from Saran Wrap cardboard tube.

Using your measuring tape, measure 1-3/8″ and mark with a pencil around the circumference of the cardboard tube.

Carefully cut your pencil lines using an Xacto knife. Repeat for up to 8 rings.

Hide cardboard tube markings (optional). I did this step because the striped fabric I used was sort of thin and I wanted to be sure to totally cover up the dark spots of adhesive remnants on the tubes.

Cut 8 strips of no-sew interfacing 1-3/8″ wide x 5-3/4″ tall.

Tape one end of the interfacing to the ring (or use your adhesive). Roll the interfacing around the ring and secure with a second piece of tape.

Wrap napkin ring with fabric.

Cut your fabric in 3-1/2″ wide by 5-3/4″ tall strip (my fabric is shown face down in the photo but it doesn’t matter).

Place the napkin ring in the center of the fabric. Secure one end with invisible tape (or glue it if you’d rather), making sure the tape covers only a tiny edge of the fabric or else you’ll see it in your final product.

Roll the fabric tightly around the ring and secure using a dab of fabric glue, being sure to put some on the raw edge to prevent fraying (alternatively, you could turn a bit of the fabric under to hide raw edges or use pinking shears to make a zigzag edge).

Put a bit of glue on one fabric end, fold inside the ring and glue to the inside of the cardboard ring. Repeat on the other side. Raw edges will meet in the middle of the inside.
Hide raw edges using ribbon.

Using your pinking shears, cut one 4-1/2″ piece of ribbon for each napkin ring.

Spread fabric glue on one side of the ribbon. Curl it up a bit, slip it inside the ring and glue the ribbon on top of the raw fabric edges to cover them up.

You can also use the end of your pencil to roll the ribbon flat inside. Let your napkin rings dry for at least 24 hours before using.

Wrap plastic utensils in a premium paper napkin (folded into quarters) and slip on the ring to secure. Fire up the grill!

Did you make it? Please post a comment and let me know how this craft idea works for you. And share your own photos at the MerrimentDesign.com Facebook page, “I made it!” flickr photo gallery or tweet a picture to @merrimentdesign. Craft and pass it on!
COPYRIGHT NOTE: You’re more than welcome to use free DIY craft idea and how to step-by-step tutorial for your own personal use. Contact me for any commercial use – this includes etsy sellers.


January 29th, 2012 at 9:22 pm
Another idea to cover these tubes is to hot glue ribbon from front to underside in circular motion. Use drop of glue each time you circle (on inside) to hold in place.
August 26th, 2011 at 9:19 am
I found the information on making these napkin rings to be very informing and great pictures in detail as to each step.
Thank you for posting all this info to share with others.
Will inform others about your site for I have briefly looked at some of the other projects you have done
July 1st, 2011 at 5:36 pm
I love this. I think I will do it!
June 24th, 2011 at 1:47 am
I just wanted to let you know that I FULLY plan on using this idea for my “upcoming” wedding, and I’m just about to use it in a blog post. I say “upcoming” because we’re not yet engaged, but we’re planning our wedding anyway. We need all the extra time we can get; so I’ve been scouring looking for awesome DIY ideas, and your is one of the best yet. Can’t wait to use them!
April 25th, 2011 at 8:27 pm
What an innovative idea! Please stop by http://www.laughloveandcraft.com to link up to my Share the Wealth Wednesday Link Party!
April 25th, 2011 at 7:40 pm
These are adorable. I love the fabric. I think I shop at all the wrong stores.
Visiting you from tip junkie!
April 19th, 2011 at 10:59 am
Hvala na ideji… ;))))
thanks for the idea :))))
February 12th, 2011 at 10:21 pm
Hi I would like to use this for my school project. Thanks for the wonderful tutorial…
January 27th, 2011 at 8:25 am
These are great! I love the idea of them! Thanks for sharing!
November 18th, 2010 at 9:54 pm
Exccelent idea! My christmas napkin ring problem is now solved! Thanks for sharing.
October 3rd, 2010 at 12:01 pm
Finally I published my own version based on this in instructables.com, quoting this, of course. Greetings!
September 27th, 2010 at 9:19 am
Thank you, Terry! I appreciate it :)
September 24th, 2010 at 8:17 am
These are so clever and an absolutely perfect project to make together with your children or grandchildren. They’re ideal for making into seasonal napkin rings, too. I’m certainly glad that you had a rainy- sunny- rainy weekend and experimented, but most especially glad that you shared your excellent results with all of us! Sincere thanks from Colorado.
August 26th, 2010 at 2:21 pm
Great idea for a wedding! Keep in mind that the napkins you choose for your wedding will need to get through the opening so I recommend a napkin test. I used a fancy cloth-like disposable kind and it looked great.
August 26th, 2010 at 9:42 am
Thanks so much for this. I’m trying to keep my wedding on a budget and looking for great ideas that are stress free DIYers :) I’ll definatly be hitting up all of my relitives for their saran wrap tubes! I think I should keep what I’m doing with them a secret though and see if they can figure it out at the wedding :) thanks again!
August 17th, 2010 at 12:13 am
I love these so much! What a cute idea. I’ll definitely be trying this out in a few months when I move into my new home and get in the mood to re-decorate!
November 6th, 2009 at 3:48 pm
Так ведь без недостатков достоинства незаметны :)
October 8th, 2009 at 11:03 pm
Как говорится – Verum est, quod pro salute fit mendacium
October 8th, 2009 at 10:35 am
Hi, just wanted to let you know I am going to feature this project on my blog. We’re an event planning company in Chicago and we love to showcase ideas that are eco-friendly. Recycled tubes that can be beautiful fun napkin rings are a great idea. THanks for sharing.
August 21st, 2009 at 2:16 am
I like this! I am all for crafty ideas that don’t look “crafty”. This is perfect :)
August 16th, 2009 at 2:07 pm
It’s very, very beautiful, easy, cheap and green. Thank you so very much for this brilliant idea!
August 15th, 2009 at 3:24 pm
We love to promote eco-friendly ideas – this is so great!
August 11th, 2009 at 6:40 am
Lovely project! I’m posting a link to it over at Curbly.
August 2nd, 2009 at 1:25 pm
Wonderful! I’m going to create an Instructable (http://www.instructables.com) based on this, with some . Of course, I will link you.
July 28th, 2009 at 3:38 pm
Wow, those are super cute! Now I’ll never be able to throw anything away…..
July 23rd, 2009 at 9:31 pm
Hi Alicia! I love that you’re using this for your eco-wedding! I would love to see the pictures when you have them. Thanks for commenting!
July 22nd, 2009 at 7:29 pm
Hello! I’m so excited about this! We’ve opted to go eco-friendly for our wedding and use compostable napkins, plates, and silverware. As much as I love my cloth napkins and china, it’s more cost effective to do it this way. I have been searching for something fun, unique, and different to dress up our plain biodegradable napkins and silverware – plus my misc. fabric pile is large enough to get this task done! (Even more eco-friendly since I already have the supplies to re-use!) Thanks for the post!
July 19th, 2009 at 9:17 pm
what a smart idea! thanks for sharing:)
July 15th, 2009 at 8:57 pm
Hi Kathleen H, good question. Yes, the interfacing step is optional. I used the interfacing because there were some brown spots on the tube that showed through my striped fabric. I called it the “Hide cardboard tube markings (optional)” step but you could totally skip it if your fabric is thick enough not to show through, or if your tube has less adhesive remnant on it than mine did. I would steering away from fleece interlining or quilt batting as I like the rings smooth and modern rather than puffy. Thanks so much for stopping by!
July 14th, 2009 at 12:40 am
Really cute idea, great use of the tube, but why on earth would you need interfacing? It doesn’t stiffen anything – the tube does that. Did you mean fleece interlining, like for tailoring jacket collars, or a thin quilt batting? That would make more sense to me, sorry.
July 13th, 2009 at 1:15 pm
What a great idea! So simple, but it looks amazing. Thanks for the thorough how-to… I’ll be linking to this on Twitter :)
July 12th, 2009 at 10:30 am
I love this and think I may be able to do it! I have all my leftover fabric from my wedding invitations (thanks again to your brilliant idea!). This would be a great way to utilize that same fabric for other events! Thank you!
July 11th, 2009 at 6:52 am
c’es superbe! je vais le practiquer ca sans doute
July 4th, 2009 at 3:28 am
Cool idea! It will be fun to try this out for outdoor entertaining.
June 29th, 2009 at 8:49 pm
This is fantastic!! I’m doing it — need to use up my saran wrap first. I’ve been looking for the perfect napkin rings.
June 29th, 2009 at 5:27 pm
Wow! Practical, simple, and inexpensive. I’m linking, too. Thanks for sharing.
June 29th, 2009 at 12:30 pm
This is such a cool and frugal idea! Very creative…now all I need is an awesome fabric stash :)
June 18th, 2009 at 9:00 am
I love this idea! Can’t wait for my Saran Wrap to run out so I can make some! :)
June 15th, 2009 at 8:26 pm
Hi Perrine, yes, thanks for asking. I’d love for you to translate it into French and put it on your site. Merci! :)
June 15th, 2009 at 3:47 am
Hello!
I really like your how to. I was wondering if I could translate it in French and add it to my list of how to as explained in my french post (http://www.petitcitron.com/index.php/form_howto.html)
Of course, your website would be quoted and there would be a link!
Thank you,
Perrine
June 11th, 2009 at 10:37 am
Nifty idea and fun to do! You can use the tubes from toilet paper and paper towel rolls, too. But, they just won’t be as sturdy.
Liz :)
June 10th, 2009 at 1:34 pm
so so cute! i’m totally doing that!
June 9th, 2009 at 7:43 pm
Oh my, those are lovely. I am bookmarking. Fantastic tutorial. Now I know what I can do with my fabric scraps. You’ve made my day !
Kate
June 9th, 2009 at 4:17 pm
I love this idea! The fabric you used is SOOOO pretty with those crisp white napkins. Love that. I’ll be linking.
June 9th, 2009 at 11:14 am
Thanks for showing another reason to be a packrat!!!!!! I love it!
June 8th, 2009 at 12:09 pm
Cute and affordable! Thanks!
June 7th, 2009 at 7:18 am
Brilliant!