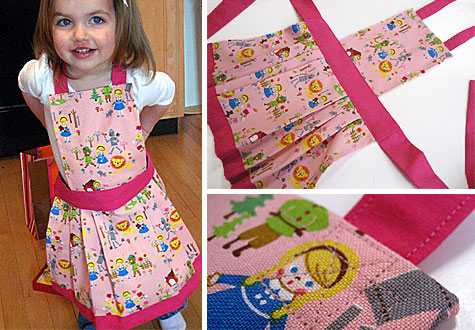

So what was in Madison’s cookie jar birthday boxes to help celebrate her second birthday? Super fun numbers cookie cutters and a child’s size pink Wizard of Oz apron handmade by Aunt Kathy.
I’ve made many aprons in my time both from patterns and from scratch. I created this child’s size pattern inspired by Amy Butler’s adult-sized short pleated apron pattern and added a cute apron top and neckties.
Madison lives in Michigan so I’d like to thank my friend Julie for letting her two-year-old daughter Paige model it here for you. This child’s pattern should fit most two and three year olds. Madison’s specific measurements are waist 19½, waist to ground 17½, waist to shoulder 10½.
While the apron is actually pretty straightforward to make, I’m breaking it into two posts so I can include tons of photos to better illustrate the instructions.
COPYRIGHT NOTE: You’re more than welcome to use this project for your own personal use. Please post a comment below or email me if you use this project so I can smile when I see that it’s being used. Craft and pass it on!
Supplies:
- Main fabric
(I used Wizard of Oz fabric as a nod to her mom Michelle’s Oz fetish)
- Contrasting fabric
- Fusible interfacing
- Thread
- Rotary cutter
, ruler
and gridded self-healing rotary mat
- Sewing machine
Cut the pieces and mark the pleats
Cut out the apron pieces using a rotary cutter, ruler
and rotary mat
:
Main fabric
Apron top: 8” wide x 11.5” tall
Apron bottom panel: 26” wide x 11.5” tall
Contrasting fabric
Neckties (cut 2): 4” x 20”
Apron trim: 2.5” x 25”
Apron waistband: 5” x 14”
Waistband ties (cut 2): 5” x 20”
Fusible interfacing
Apron waistband: 5” x 14”
Then mark the following measurements across the top of the panel starting from the left.
2, 4, 5, 7, 8, 10, 14, 16, 17, 19, 20, 22


Make side seams on apron panel and trim
On the bottom apron panel: Fold the right side under ½ inch and press the fabric, wrong sides together. Turn ½ inch again and press. Sew the seam close to the edge. Repeat on the left side.
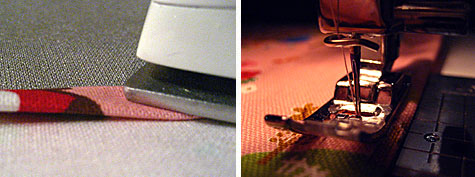

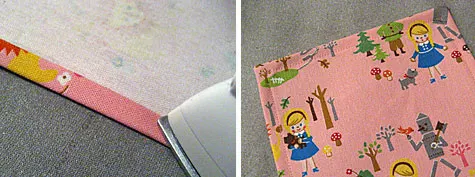
Attach the apron trim to the apron panel
On the apron trim: Fold the top long side of the apron trim ½ inch with wrong sides together and press. Fold both short sides of the apron trim ½ inch with wrong sides together and press.
Put the right side of the apron trim onto the wrong side of the apron panel, lining up the raw edges on the bottom. Pin the trim in place. Sew ½ inch seam to attach the apron trim to the apron panel.
Press the apron trim so it touches the front of the apron. Turn the apron over so the right side of the apron panel is facing up. Pin the apron trim onto the panel. Stitch the apron trim onto the apron panel by stitching ¼ inch near the edge. So it ends up that the apron trim is on the 100% on the front of the panel.
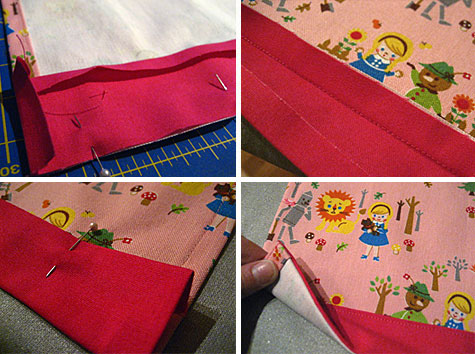

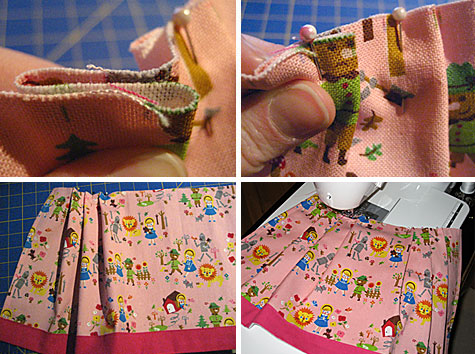
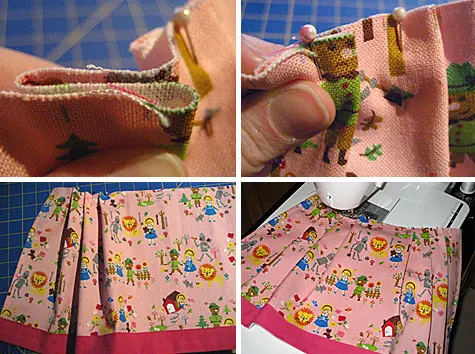
Make and sew the pleats
Make 3 pleats on each side by matching up the first two marks with right sides together. Fold the pleat toward the center of the apron and pin in place. Repeat this step until you have 3 pleats on each side.
Press the pleats and sew a 3/8” stitch across the top of the raw edge to hold the pleats in place.
Make the top panel
Fold the right side ½” inches in towards the wrong side and press. Turn it ½” again, press and sew. Repeat on the left side. Fold the top side in towards the wrong side and press. Turn it again ½” again, press and sew. The bottom edge should still be raw.

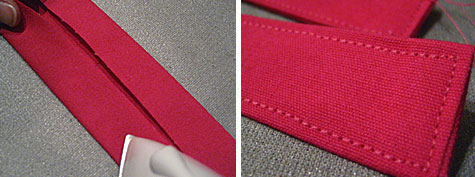
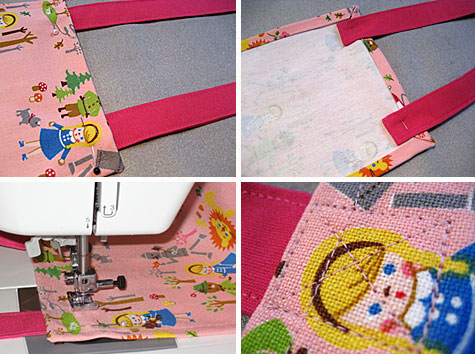
Make and attach the neck ties
Fold the neck ties in half and press, wrong sides together. Open. Fold the long sides into the center, wrong sides together, and press. Fold in half and sew ¼” around the neck tie, creating a 1” wide finished tie. Repeat for the other neck tie.

Pin the tie onto the top panel by placing it ½” from the sides and 1” from the top. Sew a square with two Xs in the middle to secure the ties onto the apron top.

What do you think so far? Part 2 of the instructions to finish the apron coming soon…
COPYRIGHT NOTE: You’re more than welcome to use this project and pattern for your own personal use. Please post a comment below or email me if you use this project so I can smile when I see that it’s being used. Craft and pass it on!
Nina
Thursday 6th of March 2014
Hi, just curious if you ever posted the end of the tutorial? I didn't see it when I searched. Thanks!
Kathy Beymer
Saturday 8th of March 2014
Hi Nina, well, I'm embarrassed to say that I never got to it. Sorry about that! Would love to see your apron when you finish it up!
Marcy
Wednesday 26th of September 2012
I am going to use your pattern for an apron for my daughter - she will be Alice from Alice in Wonderland for Halloween this year :) I will see if I can send a picture when it's done. Thanks for the tutorial!
Leslie
Friday 17th of February 2012
Where did you get that fabulous Wizard of Oz fabric?
Kathy Beymer
Saturday 18th of February 2012
Hi Leslie, back in the olden days at ReproDepot.com when they used to sell fabric. I used to stock up from them - cute stuff. You could try ebay or etsy perhaps? Thanks for stopping by!
Sally Walker
Saturday 10th of May 2008
I looked at all the creative ideas. How fun to think of all of those things and actually do them. The phone book wrapping paper reminded me of our use of the Sunday comics for the same thing. The yellow pages would be good because you could personalize your wrapping with the person's interests. I liked the Hopper pix - especially the last one. I think that one was called Sunday afternoon. The pictures on the CD cases would also be fun and easy. My favorite was the apron model! What a cute picture! Most school age children now do not even have the word apron in their vocabulary. Since they are not used as much now, the word *apron" is usually not known to them. However, Paige will know it!
Barbara England
Saturday 10th of May 2008
Greetings, Sally Walker, grandmother of Paige Simon, and wife of my dad (!) sent me you site so I could see Paige. What a great site. I've marked it as a favorite and look forward to browsing more. Such creativity and initiative is inspiring. all best, Barbara England